 Sign in to Mod The Sims
 Request: "Fence Post Extenders" That Actually Fit
 Request: "Fence Post Extenders" That Actually Fit
MTS has all free content, all the time. Donate to help keep it running.
SCREENSHOTS

OffsetColumns_small.JPG - width=640 height=452
Fence post extenders, in use
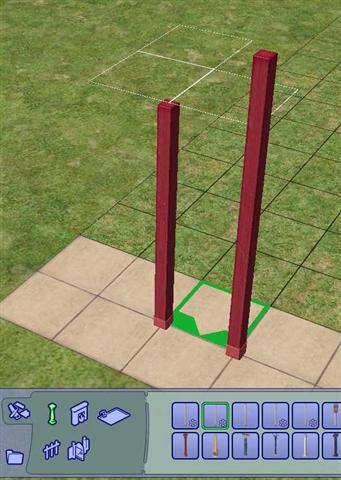
ColumnPlacement2_small.JPG - width=341 height=480
Fence post extenders, showing offset and relative size
Created by Sophie-David
Uploaded: 14th Feb 2008 at 3:38 PM
Updated: 29th Feb 2012 at 8:39 PM - Improve the formatting of the text
Updated: 29th Feb 2012 at 8:39 PM - Improve the formatting of the text
Title: "Fence Post Extenders" That Actually Fit
At Phaenoh's request, I have adapted my Simple Columns That Actually Fit to have a built-in offset for use with porch railings or fences. As illustrated in Phae's award winning Katrina series, simple columns can look quite effective when blended in with porch fences, but this normally requires the use of boolProp snapObjectsToGrid false and some precise fiddling to place the column in just the right place.
The two simple columns in this upload already have the correct half-tile offset built-in, to make placement of these "fence post extenders" an easy task. It is not even necessary to use move_objects on to overlay a fence post with these or the game's built-in columns. But unlike the Maxis posts, these columns are tall enough to actually join up with an overhanging roof without leaving an unrealistic and unsightly gap.
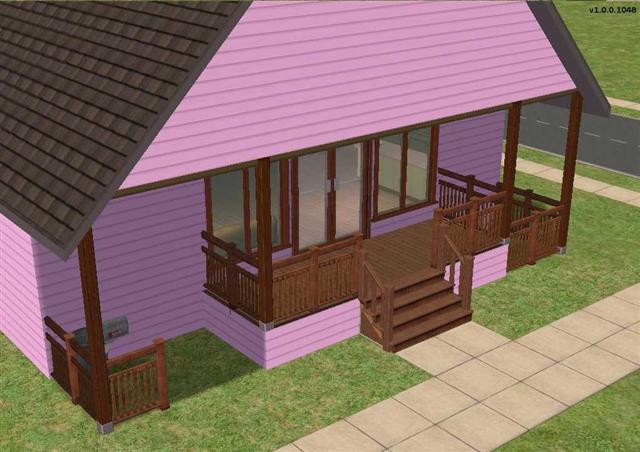
As seen in the picture above, the columns blend in very nicely with the porch fences, and it is not immediately obvious that they are different objects sharing the same tile.
The Medium #2 Offset Column is equivalent to my 5% Taller Column in Simple Columns That Actually Fit, and the Medium #4 Offset Column equates to the 31% Taller Column. The Medium #2 column is appropriate for supporting a roof from a porch or foundation, and the Medium #4 column is tall enough to reach from the ground at the base of a foundation up to the roof line. In honour of Phae's Katrina project, the columns are slightly discounted below the game's original price: the #2 column costs §68, and the #4 column costs §69.

Tech Notes
As seen above, these offset columns are placed at exactly the intersection between four tiles. The column can be adjusted to any of the four possible tile intersections by rotating it with the mouse or the comma and period (dot) on the keyboard. Because of the offset and through the use of rotation, it is possible to exactly overlay one column with its neighbour on the next tile without using move_objects on, which would be a waste of money. Note that in the picture, I am using the mouse to place the taller column on the right, i.e. the column is positioned to the right of and at the front of the green placement arrow.
These offset columns use the repository technique to reference the recolours of the base game's original. Please recolour the original if you wish these posts to be available in other colours. I am indebted to the Slave Object Tutorial by IgnorantBliss for making a complex procedure easy. And with credit to advice from Jasana BugBreeder and Rebecah, these columns are visible from the neighbourhood view, even in the base game.
Terms of Use
You may include either of these objects in uploaded lots, whether free or for pay. Please provide a credit and link back to this page. It would be nice if you sent me a PM with a link to your creation, but this is not necessary. Please do not upload these columns otherwise than in lots. Pictures that include the columns may be published without any credit or link.
Additional Credits
SimPE and CEP, which together make it all possible
Milkshape 3D, for adjusting the height and position of the columns
Microsoft Paint and Microsoft Photo Editor, for preparing the uploaded screen captures
Polygon Counts
Lot View: 94 faces, 158 vertices for each object, the same as the Maxis original.
Neighbourhood View: 20 faces, 32 vertices for each object, the same as the Maxis original.
August 1, 2011 Update: Both objects were reduced in filesize from about 48k to 12k. Column placement is also more flexible, allowing them to be positioned on beach lots, in the water, etc.
At Phaenoh's request, I have adapted my Simple Columns That Actually Fit to have a built-in offset for use with porch railings or fences. As illustrated in Phae's award winning Katrina series, simple columns can look quite effective when blended in with porch fences, but this normally requires the use of boolProp snapObjectsToGrid false and some precise fiddling to place the column in just the right place.
The two simple columns in this upload already have the correct half-tile offset built-in, to make placement of these "fence post extenders" an easy task. It is not even necessary to use move_objects on to overlay a fence post with these or the game's built-in columns. But unlike the Maxis posts, these columns are tall enough to actually join up with an overhanging roof without leaving an unrealistic and unsightly gap.
As seen in the picture above, the columns blend in very nicely with the porch fences, and it is not immediately obvious that they are different objects sharing the same tile.
The Medium #2 Offset Column is equivalent to my 5% Taller Column in Simple Columns That Actually Fit, and the Medium #4 Offset Column equates to the 31% Taller Column. The Medium #2 column is appropriate for supporting a roof from a porch or foundation, and the Medium #4 column is tall enough to reach from the ground at the base of a foundation up to the roof line. In honour of Phae's Katrina project, the columns are slightly discounted below the game's original price: the #2 column costs §68, and the #4 column costs §69.
Tech Notes
As seen above, these offset columns are placed at exactly the intersection between four tiles. The column can be adjusted to any of the four possible tile intersections by rotating it with the mouse or the comma and period (dot) on the keyboard. Because of the offset and through the use of rotation, it is possible to exactly overlay one column with its neighbour on the next tile without using move_objects on, which would be a waste of money. Note that in the picture, I am using the mouse to place the taller column on the right, i.e. the column is positioned to the right of and at the front of the green placement arrow.
These offset columns use the repository technique to reference the recolours of the base game's original. Please recolour the original if you wish these posts to be available in other colours. I am indebted to the Slave Object Tutorial by IgnorantBliss for making a complex procedure easy. And with credit to advice from Jasana BugBreeder and Rebecah, these columns are visible from the neighbourhood view, even in the base game.
Terms of Use
You may include either of these objects in uploaded lots, whether free or for pay. Please provide a credit and link back to this page. It would be nice if you sent me a PM with a link to your creation, but this is not necessary. Please do not upload these columns otherwise than in lots. Pictures that include the columns may be published without any credit or link.
Additional Credits
SimPE and CEP, which together make it all possible
Milkshape 3D, for adjusting the height and position of the columns
Microsoft Paint and Microsoft Photo Editor, for preparing the uploaded screen captures
Polygon Counts
Lot View: 94 faces, 158 vertices for each object, the same as the Maxis original.
Neighbourhood View: 20 faces, 32 vertices for each object, the same as the Maxis original.
This is a new mesh, and means that it's a brand new self contained object that usually does not require a specific Pack (although this is possible depending on the type). It may have Recolours hosted on MTS - check below for more information.
| Filename | Size | Downloads | Date | |||||
|
SDcolumnvalue_offset.zip
| Height adjusted "fence post extenders"
Size: 17.0 KB · Downloads: 4,648 · 14th Feb 2008 |
17.0 KB | 4,648 | 14th Feb 2008 | |||||
| For a detailed look at individual files, see the Information tab. | ||||||||
Key:
- - File was updated after upload was posted
Install Instructions
Basic Download and Install Instructions:
1. Download: Click the download link to save the .rar or .zip file(s) to your computer.
2. Extract the zip, rar, or 7z file.
3. Place in Downloads Folder: Cut and paste the .package file(s) into your Downloads folder:
1. Download: Click the download link to save the .rar or .zip file(s) to your computer.
2. Extract the zip, rar, or 7z file.
3. Place in Downloads Folder: Cut and paste the .package file(s) into your Downloads folder:
- Origin (Ultimate Collection): Users\(Current User Account)\Documents\EA Games\The Sims™ 2 Ultimate Collection\Downloads\
- Non-Origin, Windows Vista/7/8/10: Users\(Current User Account)\Documents\EA Games\The Sims 2\Downloads\
- Non-Origin, Windows XP: Documents and Settings\(Current User Account)\My Documents\EA Games\The Sims 2\Downloads\
- Mac: Users\(Current User Account)\Documents\EA Games\The Sims 2\Downloads
- Mac x64: /Library/Containers/com.aspyr.sims2.appstore/Data/Library/Application Support/Aspyr/The Sims 2/Downloads
- For a full, complete guide to downloading complete with pictures and more information, see: Game Help: Downloading for Fracking Idiots.
- Custom content not showing up in the game? See: Game Help: Getting Custom Content to Show Up.
- If you don't have a Downloads folder, just make one. See instructions at: Game Help: No Downloads Folder.
Also Thanked - Users who thanked this download also thanked:
Packs Needed
None, this is Sims 2 base game compatible!
Tags