 Sign in to Mod The Sims
- Site Map >
- Modding and Creation >
- Sims 3 Creation >
- Meshing >
- Blender - Accessory turns sideways..?
- Site Map >
- Modding and Creation >
- Sims 3 Creation >
- Meshing >
- Blender - Accessory turns sideways..?
Replies: 14 (Who?), Viewed: 800 times.
#1
 17th Sep 2023 at 5:07 PM
17th Sep 2023 at 5:07 PM
Posts: 38
Thanks: 36 in 1 Posts

Sorry if this belongs in object creation instead of meshing, I was not sure
Advertisement
#2
17th Sep 2023 at 9:13 PM
17th Sep 2023 at 9:13 PM
Posts: 484
Thanks: 10 in 2 Posts
If the mesh you started with was an .obj, Blender applies a rotation to make it display properly that the GEOM tools don't retain.
Likewise, any other changes made in Object Mode need to be applied before exporting.
I still had a tutorial screenshot laying around about it:
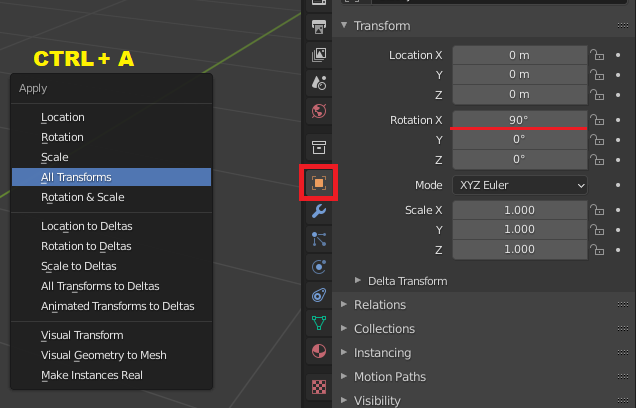
CTRL + A in the viewport to open the Apply menu, select All Transforms.
You can also add that 90 degrees to the one that got rotated and apply it to fix it.
Likewise, any other changes made in Object Mode need to be applied before exporting.
I still had a tutorial screenshot laying around about it:
CTRL + A in the viewport to open the Apply menu, select All Transforms.
You can also add that 90 degrees to the one that got rotated and apply it to fix it.
#3
17th Sep 2023 at 10:00 PM
17th Sep 2023 at 10:00 PM
Posts: 38
Thanks: 36 in 1 Posts
Quote: Originally posted by CardinalSims
|
If the mesh you started with was an .obj, Blender applies a rotation to make it display properly that the GEOM tools don't retain. Likewise, any other changes made in Object Mode need to be applied before exporting. I still had a tutorial screenshot laying around about it: CTRL + A in the viewport to open the Apply menu, select All Transforms. You can also add that 90 degrees to the one that got rotated and apply it to fix it. |
Thank you! That worked! One more thing, I want it to have 4 channels with half of the feathers being a different color than the other half, but to make it I just used a bunch of copies of the colorful feather object. It already had a UV map, which only has one feather on it, I dont know how to add another feather so that it can be a different color
#4
18th Sep 2023 at 1:55 AM
18th Sep 2023 at 1:55 AM
Posts: 484
Thanks: 10 in 2 Posts
Each piece likely still has its own UV, they're all just perfectly stacked together.
If you skip the human-centric part of this tutorial to the general tips after the green header, there are a couple of tools with animated examples that you can use to grab just one of these to move it.
Select Linked will allow you to grab the pieces of the feathers you want to be separated, then UV Sync (a button visible when a viewport is set to UV Editor) will highlight only the UVs for those pieces. Then you can move them around.
It may help to edit the texture beforehand to fit the duplicate parts together where you want them in the image, then you can open that texture in the UV editor and move the parts around to fit on it.
#5
18th Sep 2023 at 10:32 AM
18th Sep 2023 at 10:32 AM
Posts: 38
Thanks: 36 in 1 Posts
Quote: Originally posted by CardinalSims
|
Each piece likely still has its own UV, they're all just perfectly stacked together. If you skip the human-centric part of this tutorial to the general tips after the green header, there are a couple of tools with animated examples that you can use to grab just one of these to move it. Select Linked will allow you to grab the pieces of the feathers you want to be separated, then UV Sync (a button visible when a viewport is set to UV Editor) will highlight only the UVs for those pieces. Then you can move them around. It may help to edit the texture beforehand to fit the duplicate parts together where you want them in the image, then you can open that texture in the UV editor and move the parts around to fit on it. |
Ok thank you, I figured it out!

#6
18th Sep 2023 at 11:11 AM
18th Sep 2023 at 11:11 AM
Posts: 38
Thanks: 36 in 1 Posts
Wait actually there is still something wrong with it, it still crashes when I select it in CAS. Do I need to do lod 2 and 3 before it will work?
#7
18th Sep 2023 at 2:01 PM
18th Sep 2023 at 2:01 PM
Posts: 484
Thanks: 10 in 2 Posts
There are a few things that can cause crashes, hard to tell without seeing the package. LOD problems usually don't appear until live mode, as CAS will only show the highest.
It's possible the item you're working with might have the same bug I had to fix on hairs, caused by the GEOM tools. If you open the package in S3PE and select the GEOM, could you see if the preview shows an error or displays the information correctly (it might take a few seconds to load, either way)?
If it looks fine, I think I've had bad bone assignments cause crashes as well.
#8
18th Sep 2023 at 2:14 PM
18th Sep 2023 at 2:14 PM
Posts: 38
Thanks: 36 in 1 Posts
Quote: Originally posted by CardinalSims
|
There are a few things that can cause crashes, hard to tell without seeing the package. LOD problems usually don't appear until live mode, as CAS will only show the highest. It's possible the item you're working with might have the same bug I had to fix on hairs, caused by the GEOM tools. If you open the package in S3PE and select the GEOM, could you see if the preview shows an error or displays the information correctly (it might take a few seconds to load, either way)? If it looks fine, I think I've had bad bone assignments cause crashes as well. |
The information is displayed correctly
Its possible I didnt even assign the bones.. I was not sure how to do that
#9
18th Sep 2023 at 11:59 PM
18th Sep 2023 at 11:59 PM
Posts: 484
Thanks: 10 in 2 Posts
That rules that out at least 
Usually bones are assigned by copying them from a similar item (usually the reference/clone), though if what you have made is positioned differently this may not have the desired effect.
MeshToolKit can copy from one to another under 'Auto tools for GEOM'.
Blender also retains bone information and shows it under Object Data Properties (green triangle icon) as Vertex Groups. If there are some left over from the old object there, you could try removing them here first and work on replacing them later. It's technically possible to do the assignments manually in Blender, but it isn't documented well enough for me to know the exact steps.
#10
19th Sep 2023 at 2:21 PM
19th Sep 2023 at 2:21 PM
Posts: 865
Quote: Originally posted by aspenrose
| ... feathers being a different color than the other half, but to make it I just used a bunch of copies of the colorful feather object. It already had a UV map, which only has one feather on it, I dont know how to add another feather so that it can be a different color |
Feathers may be your crash issue. What is your vertices/ face/ polycount for L1, or L0, as the case may be??? Also, use face orientation to check for backfaces, before using any merge tool. Feathers are similar to hair, which @CardinalSims know all about. It automatically doubles the count. I have worked with feathers on a recent project, and reducing them, while maintaining appearance was a nightmare. I do not know if cat parts have same count restrictions as garments, but suspect they do. There is a chart found in one of the tools in MTK that is my guide, I do not know if such a chart exists for pets meshes.
And you should not NEED to make L2, 3 for testing... if cloning from an EA part. Those are already there, just of the old L1 mesh. Only thing that happens is as you pull back, the mesh suddenly changes to the old L2, 3.
Shiny, happy people make me puke!
#11
19th Sep 2023 at 3:18 PM
19th Sep 2023 at 3:18 PM
Posts: 38
Thanks: 36 in 1 Posts
Quote: Originally posted by CardinalSims
|
That rules that out at least Usually bones are assigned by copying them from a similar item (usually the reference/clone), though if what you have made is positioned differently this may not have the desired effect. MeshToolKit can copy from one to another under 'Auto tools for GEOM'. Blender also retains bone information and shows it under Object Data Properties (green triangle icon) as Vertex Groups. If there are some left over from the old object there, you could try removing them here first and work on replacing them later. It's technically possible to do the assignments manually in Blender, but it isn't documented well enough for me to know the exact steps. |
Ok, the problem was that it had no bone assignments. It doesnt crash now but it looks really bad.. I think part of that is because the collars only have bone assignments for the head and neck area. Is there a way to assign different ones?

There are probably many more things wrong with it, it looks incredibly fucked..
#12
20th Sep 2023 at 3:20 AM
20th Sep 2023 at 3:20 AM
Posts: 484
Thanks: 10 in 2 Posts
Still making progress every time! For a type of CAS creation that doesn't really have any documentation, I think it's coming along well
I think most of the TS3 related tutorials assign bones in Milkshape, which is a little tedious these days.
I remember some discussion about doing it with Blender's weight paint, with mixed opinions on how it turned out. The general idea is that if a vertex group with the same name as a bone exists, that bone should influence that group.
You can enable bone names on that rig you imported to find what each one is:
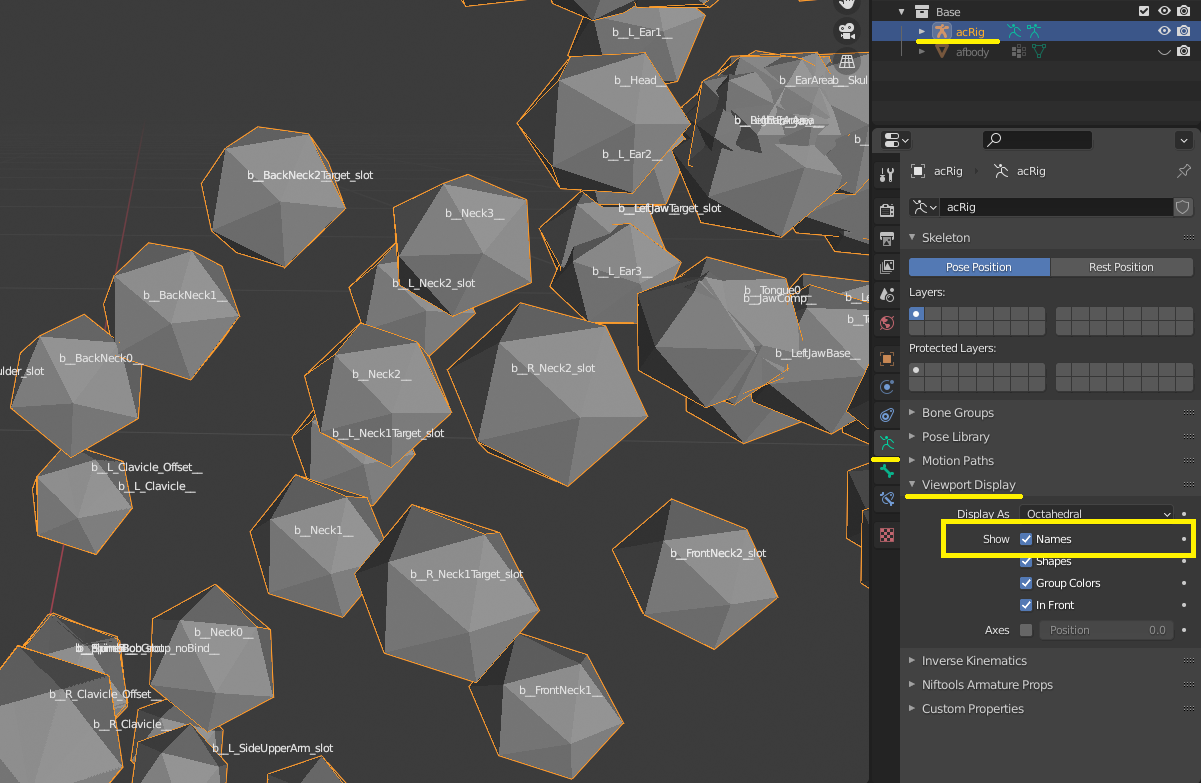
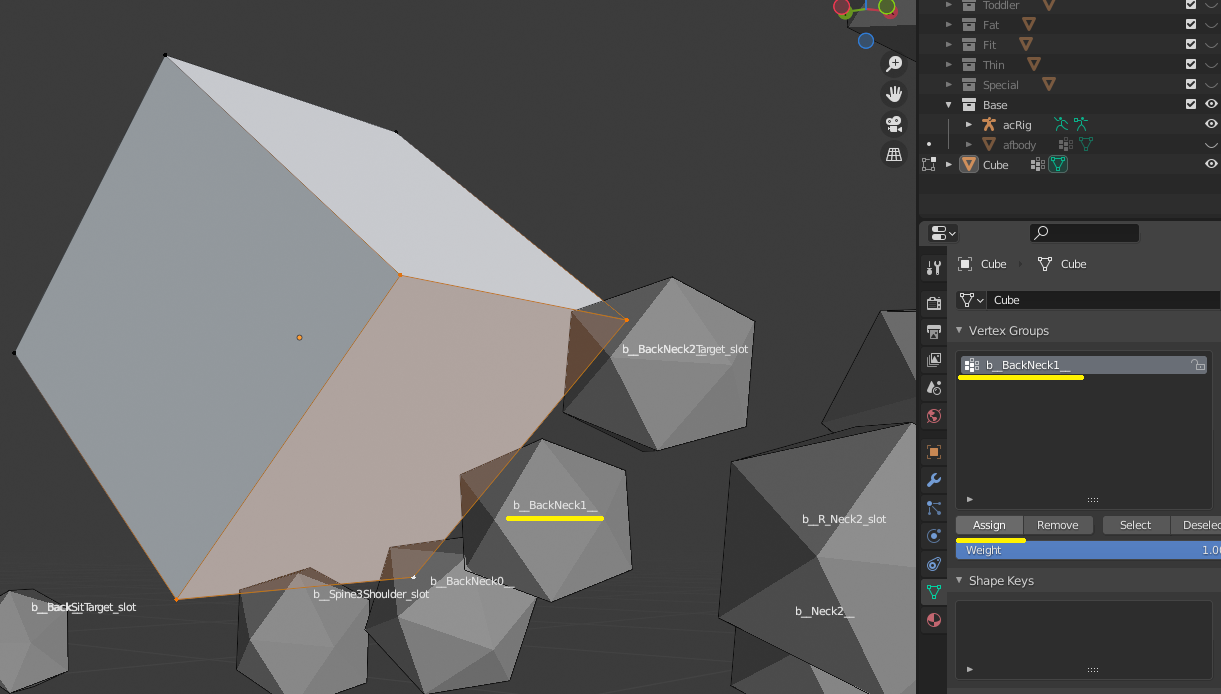
Then it's just a matter of making a group with that name (take care with what appears to be double underscores in some of the names) and assigning it to vertices. I used a little cube for demonstration purposes:
In Weight Paint mode, you can get a preview of what's going on. The brush tool also allows you to assign them with different strengths, if you'd prefer some softer gradients.
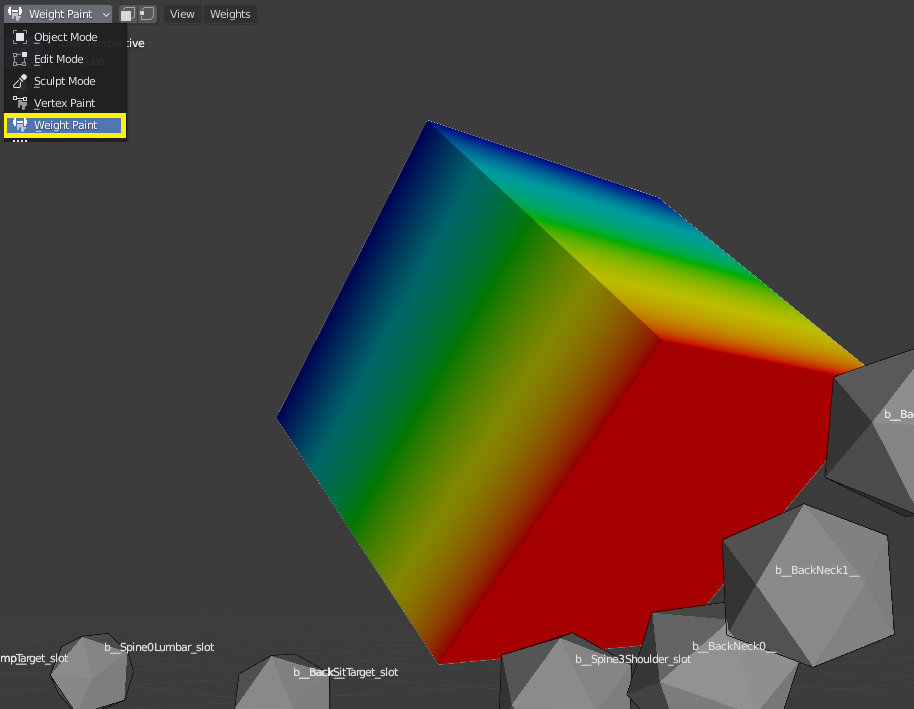
And if you want to get fancy with it, you can use multiple and be more precise with the placements.
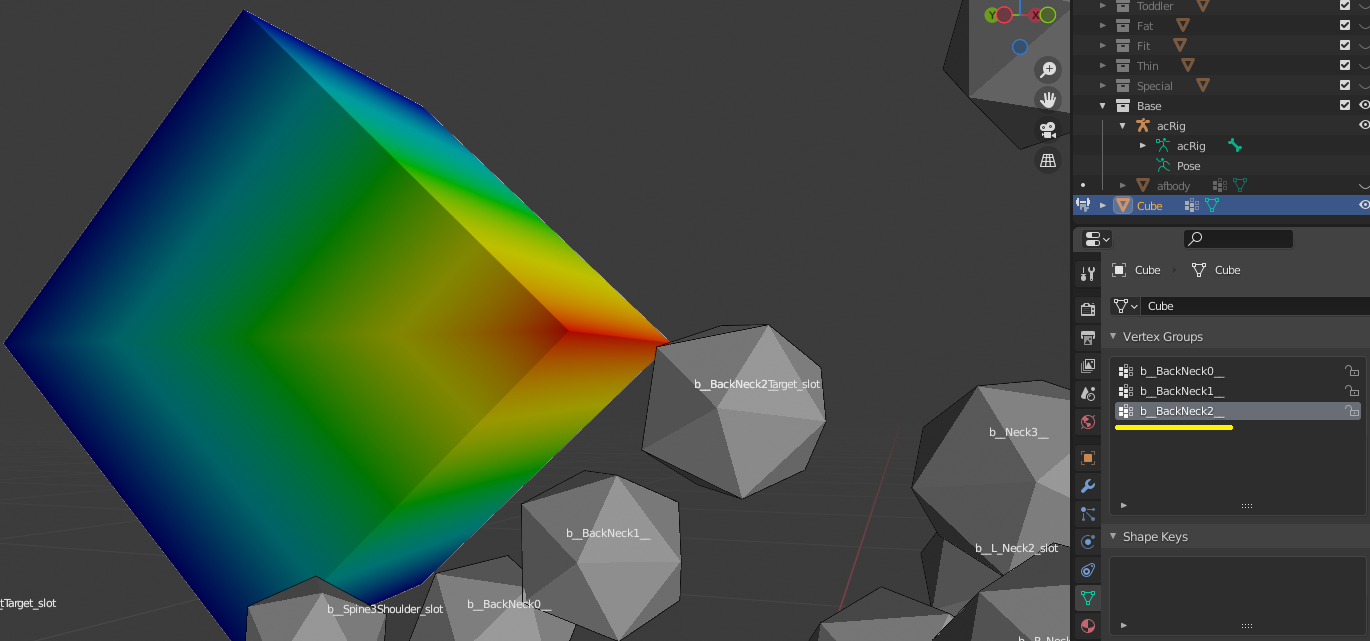
I think I remember Lyralei noting that the order that the groups are in matters and that Blender may not handle it all that well. If this has unwanted effects ingame, it's less likely that you did something wrong and more likely that we just don't know all the steps to making it TS3 compatible yet. I'd be happy to troubleshoot it with you, if so, because the lack of an existing tutorial means there is a gap out there for me to fill
I think most of the TS3 related tutorials assign bones in Milkshape, which is a little tedious these days.
I remember some discussion about doing it with Blender's weight paint, with mixed opinions on how it turned out. The general idea is that if a vertex group with the same name as a bone exists, that bone should influence that group.
You can enable bone names on that rig you imported to find what each one is:
Then it's just a matter of making a group with that name (take care with what appears to be double underscores in some of the names) and assigning it to vertices. I used a little cube for demonstration purposes:
In Weight Paint mode, you can get a preview of what's going on. The brush tool also allows you to assign them with different strengths, if you'd prefer some softer gradients.
And if you want to get fancy with it, you can use multiple and be more precise with the placements.
I think I remember Lyralei noting that the order that the groups are in matters and that Blender may not handle it all that well. If this has unwanted effects ingame, it's less likely that you did something wrong and more likely that we just don't know all the steps to making it TS3 compatible yet. I'd be happy to troubleshoot it with you, if so, because the lack of an existing tutorial means there is a gap out there for me to fill

#13
20th Sep 2023 at 1:56 PM
20th Sep 2023 at 1:56 PM
Posts: 865
Quote: Originally posted by CardinalSims
|
Still making progress every time! For a type of CAS creation that doesn't really have any documentation, I think it's coming along well I think most of the TS3 related tutorials assign bones in Milkshape, which is a little tedious these days. I remember some discussion about doing it with Blender's weight paint, with mixed opinions on how it turned out. The general idea is that if a vertex group with the same name as a bone exists, that bone should influence that group. You can enable bone names on that rig you imported to find what each one is: Then it's just a matter of making a group with that name (take care with what appears to be double underscores in some of the names) and assigning it to vertices. I used a little cube for demonstration purposes: In Weight Paint mode, you can get a preview of what's going on. The brush tool also allows you to assign them with different strengths, if you'd prefer some softer gradients. And if you want to get fancy with it, you can use multiple and be more precise with the placements. I think I remember Lyralei noting that the order that the groups are in matters and that Blender may not handle it all that well. If this has unwanted effects ingame, it's less likely that you did something wrong and more likely that we just don't know all the steps to making it TS3 compatible yet. I'd be happy to troubleshoot it with you, if so, because the lack of an existing tutorial means there is a gap out there for me to fill
|
This is kind of part of the tutorial I have been working on. In general, small parts should have no more than 2... possibly 3 bones. Although, I am not sure how much that will matter with a pet mesh. Reason is horrible distortion when moving, or using sliders. It will cause the small parts to stretch, or twist, and look pretty bad. But again, not sure of what will happen on a pet mesh.
The easiest way to try to rebone first, is to separate the feathers from the body mesh and use MTK to simply transfer the body bone weights to the feathers. Then import back to Blender and put the meshes back together.
Another trick, is to import your mesh, then import the matching rig with Blender tools. Click the mesh, then rig. In drop down, Object> Parent> Armature Deform. The mesh is attached to the rig. Click the rig, and click Object/ Edit tab. Click Pose. Choose rig bones and move them around to see how your mesh and feathers react. When done, return to Object mode and delete the rig. The mesh will pop back to normal. I do this for almost everything I make to check clipping and small parts distortion.
Shiny, happy people make me puke!
#14
21st Sep 2023 at 2:18 AM
21st Sep 2023 at 2:18 AM
Posts: 484
Thanks: 10 in 2 Posts
Quote: Originally posted by LadySmoks
|
This is kind of part of the tutorial I have been working on. In general, small parts should have no more than 2... possibly 3 bones. Although, I am not sure how much that will matter with a pet mesh. Reason is horrible distortion when moving, or using sliders. It will cause the small parts to stretch, or twist, and look pretty bad. But again, not sure of what will happen on a pet mesh. The easiest way to try to rebone first, is to separate the feathers from the body mesh and use MTK to simply transfer the body bone weights to the feathers. Then import back to Blender and put the meshes back together. Another trick, is to import your mesh, then import the matching rig with Blender tools. Click the mesh, then rig. In drop down, Object> Parent> Armature Deform. The mesh is attached to the rig. Click the rig, and click Object/ Edit tab. Click Pose. Choose rig bones and move them around to see how your mesh and feathers react. When done, return to Object mode and delete the rig. The mesh will pop back to normal. I do this for almost everything I make to check clipping and small parts distortion. |
Thank you for the clarification! I wasn't sure how much anyone had actually looked into it.
I also totally forgot that the original body meshes would have bones to use as reference. That's probably a great place to start at first and leave manual tweaks for the most stubborn of placements. Somehow I always start with the most over-engineered solution and work my way backwards to things that make sense
#15
21st Sep 2023 at 2:00 PM
21st Sep 2023 at 2:00 PM
Posts: 865
Quote: Originally posted by CardinalSims
|
Thank you for the clarification! I wasn't sure how much anyone had actually looked into it. I also totally forgot that the original body meshes would have bones to use as reference. That's probably a great place to start at first and leave manual tweaks for the most stubborn of placements. Somehow I always start with the most over-engineered solution and work my way backwards to things that make sense
|
OY! I always go with simple first. Simple mind... simple answers!
 Although having stepped back to reread my post, I should clarify something.
 When I say 2 bone weights, I mean that if the body where the small part (feather in this case) attaches to the body has multiple weights from 3 or 4 bones, use the 2 most dominant bones for the small part. The small part is painted solid for each weight, totaling 1.000 (in Blender scale). This is what prevents mesh movements from twisting and distorting the small part. I really should get that tutorial finished. I am also including morphs, which is another small part exploder, especially the fat morph.
Shiny, happy people make me puke!
Who Posted
|
|