Hi there! You are currently browsing as a guest. Why not create an account? Then you get less ads, can thank creators, post feedback, keep a list of your favourites, and more!
Feeder of Cheesecake to Llamas
retired moderator
Original Poster
#1 Old 18th Mar 2006 at 12:21 PM Last edited by leefish : 7th Jan 2014 at 11:31 PM.
Default How to Add Shadows and Highlights
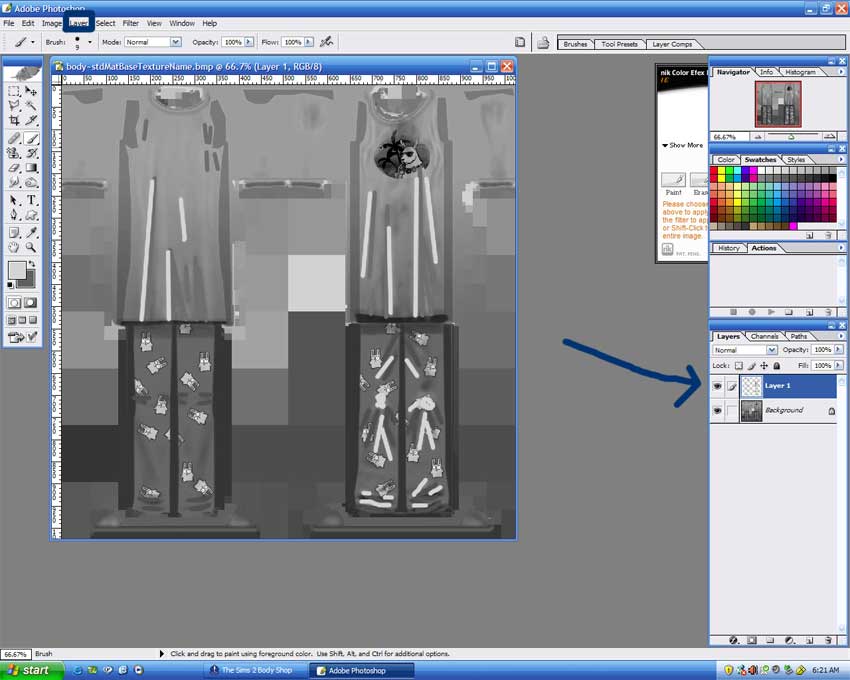
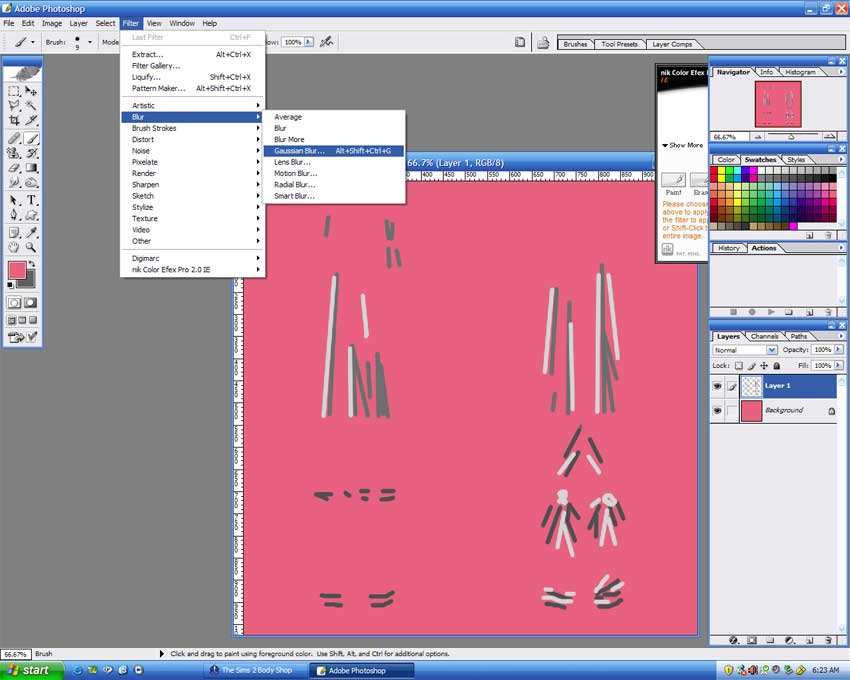
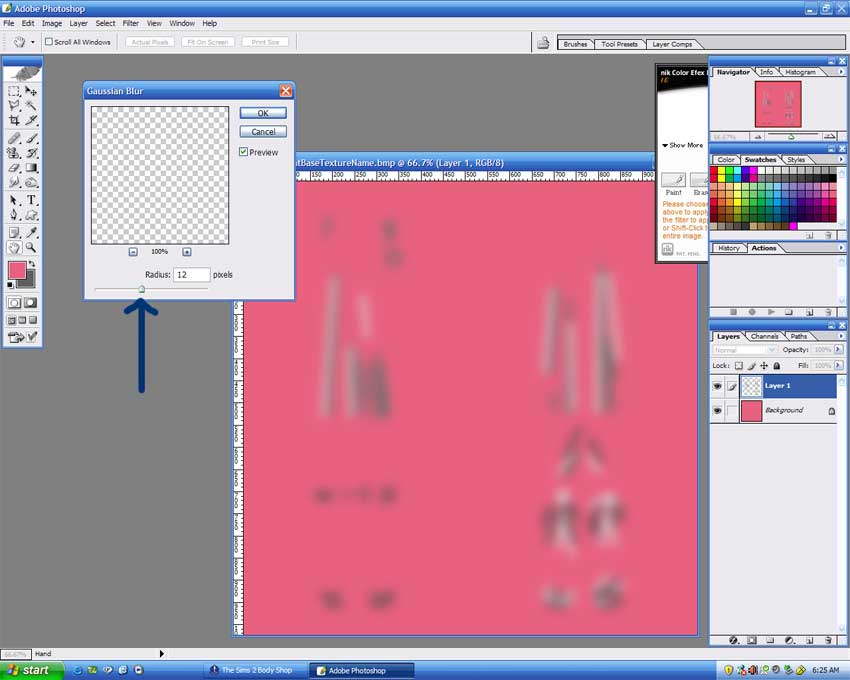
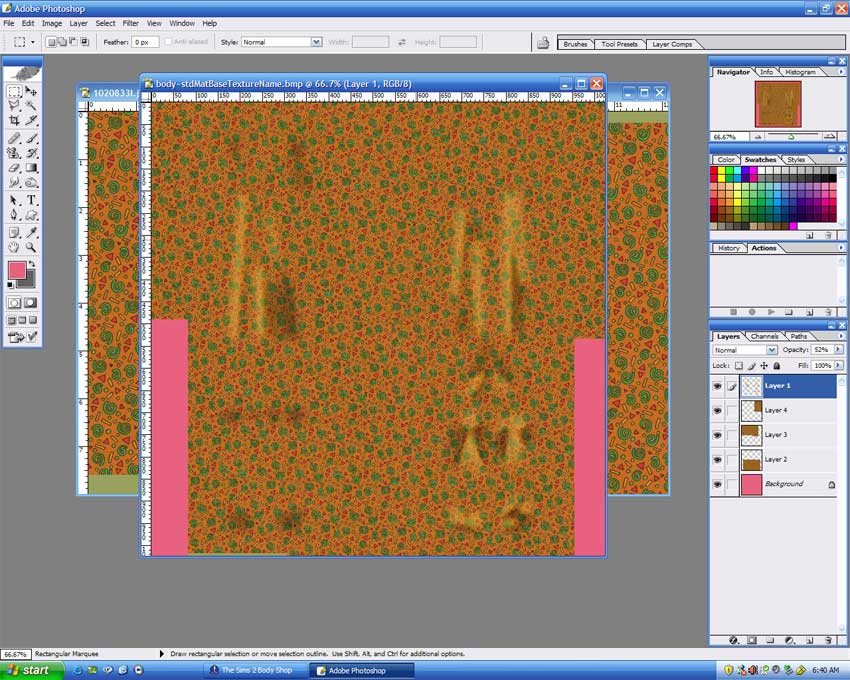
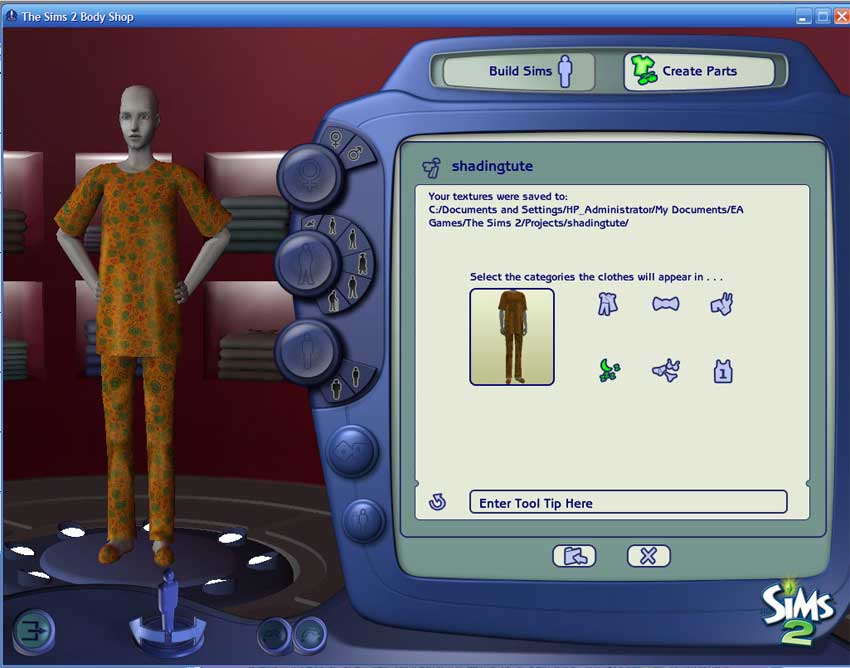
This tutorial uses Photoshop
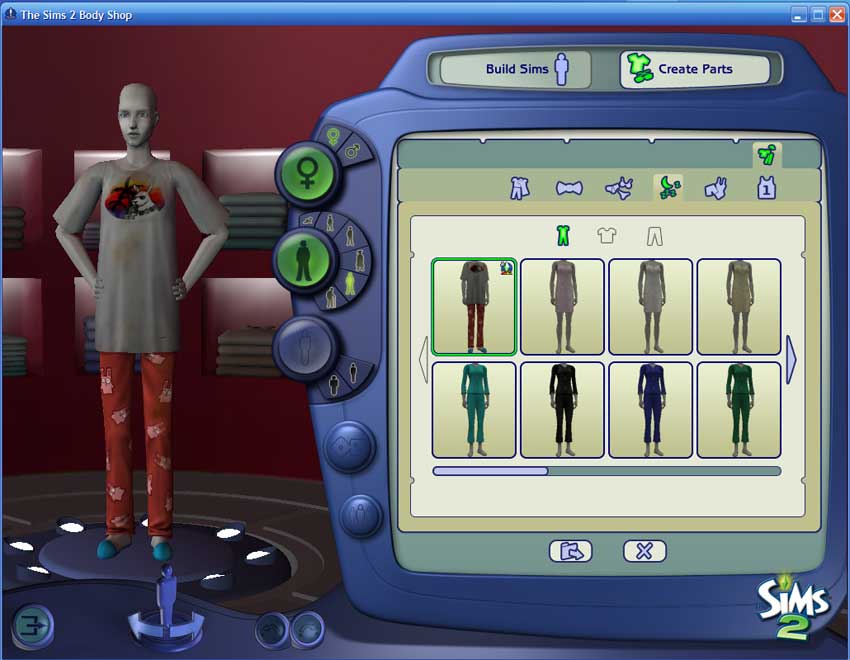
If you dont have Photoshop, there is also a tutorial using GIMP HERE

In this mini-tutorial, I’ll show you a useful shading technique that’s different from what I used in the Adding Textures tutorial. Live and learn! This is useful for Maxis items that have a print that you don’t want on the new outfit, or for shading a texture that has too many different color values to look right with dodge and burn. Let’s start with these pajamas.


First, we open up the texture file and desaturate it. Next, we go to the Layers menu and make a new, blank layer.


You can color in the shadows and highlights with black and white, shades of gray, however sharp you want the contrast to start out. Since this is a layer all by itself, it’s very easy to go back and forth and change it if it doesn’t look right.

All the lines you see have been painted on the new layer, and whatever else we do, we’re keeping this layer on top.


I’ve filled the background with pink so you can see what’s happening here. Now that we have our lines, we’re going to the Filter menu, selecting Blur>Gaussian Blur.


A nice little box pops up, and the slider will allow you to choose how many pixels out you want the blur to spread. What’s nice is that you will see the change as you slide, so you can decide right there what looks nice to you. And once you hit OK, you can still go back and change it if you like.


Here’s one of those textures I was talking about. If you try to use dodge and burn on this one, it most certainly doesn’t look like highlights and shadows. And here’s the other nice thing about this shading method - I selected Image>Adjustments>Hue/Saturation>Colorize and changed the color of the shadows to match the background color of my texture. Then more tweaking - Image>Adjustments>Brightness/Contrast, and an opacity change on Layer 1. What you have to do will depend on the texture you select and how it looks in body shop.


So you see here some subtle shadows and highlights, and the color of the texture hasn’t had to be changed at all, and you don’t even need to be a figure drawing expert to do it!

Screenshots
Attached files:
File Type: zip  Shading Tutorial.zip (1.16 MB, 1546 downloads)
Advertisement
Lab Assistant
#2 Old 20th Mar 2006 at 4:17 AM
Wicked. Extremely helpful. Thanks again.
Test Subject
#3 Old 20th Mar 2006 at 5:21 AM
Wow! didn't know it could be that simple! thanks
Test Subject
#4 Old 29th Mar 2006 at 9:39 PM
where do you get your fabrics?

**rent this space**
Lab Assistant
#5 Old 31st Mar 2006 at 10:16 AM
thanx thats awsome! i have been trying to work out how to add shading to my work to make it look more realistic!
Feeder of Cheesecake to Llamas
retired moderator
Original Poster
#6 Old 31st Mar 2006 at 2:57 PM
Quote: Originally posted by the_book_of_shadows
where do you get your fabrics?


I google. I pick a fabric type I'm interested in, say, "paisley" or "rib knit jersey" and do an image search. If I find a site that has a lot of lovely images I can use, I take screenshots of all the ones I like. Another good source is the back pages and ads in sewing magazines and home decorating magazines. They almost always include their websites. Once you have your images, check my tutorial on making textures from images.

"Living well is the best revenge. . ." George Bernard Shaw
Test Subject
#7 Old 1st Apr 2006 at 7:40 PM
I don't get the part where you add the background....How do you add the background? I'm confused....
Feeder of Cheesecake to Llamas
retired moderator
Original Poster
#8 Old 2nd Apr 2006 at 6:01 PM
It's a new layer. Simply by copying the texture image and pasting it into your project's texture file, you create a new layer. It's something PhotoShop does automatically.

"Living well is the best revenge. . ." George Bernard Shaw
Test Subject
#9 Old 2nd Apr 2006 at 11:40 PM Last edited by EternalMoonPower : 3rd Apr 2006 at 12:18 AM.
OK...but...so you paste it in the what file??? (sorry I'm new to BodyShop kinda........ :sadpanda: ) Well, what I mean is do you have to color the background PINK??? Then do you have to paste in a background thingy magiger??? B-b-but when I tried to paste in a background it covered the shadow lines and stuff!!!!!! :madashel: AAAAAAAAHHHH!!!!!!!!!!! I'M SO CONFUSED!!!!!!!!!!!!!!!! * falls on the floor dead *
Feeder of Cheesecake to Llamas
retired moderator
Original Poster
#10 Old 3rd Apr 2006 at 1:37 AM
Then you need to go back and read the basic recoloring tutorials at the top of this forum.

"Living well is the best revenge. . ." George Bernard Shaw
Instructor
#11 Old 3rd Apr 2006 at 5:32 PM
can this ne done with the GIMP? if so, how??
Test Subject
#12 Old 4th Apr 2006 at 11:40 PM
Quote: Originally posted by Faylen
Then you need to go back and read the basic recoloring tutorials at the top of this forum.


:nod:ok... :nod:
Test Subject
#13 Old 8th Apr 2006 at 2:50 PM
thanks for the great tutorial!
Instructor
#14 Old 11th Apr 2006 at 9:03 AM
I'ts very interesting and most of all, you have explain everything with great clarity, thank you!
Test Subject
#15 Old 30th May 2006 at 1:34 AM
is this how you get the nice metallic look clothing? or do you achieve that with a different method? can someone point me in the right direction?...i've been looking on how to do this all day and I can't find anything. I would like to create very shiney clothes like how satin or metallicized fabrics are. thanx.
world renowned whogivesafuckologist
retired moderator
#16 Old 30th May 2006 at 1:47 AM
This method should be able to be modified to create shiny-looking textures - you'd use thinner lines and blur less. Usually "shiny" texturing is done high-contrast, with a small, stark area of highlighting against a darker background. Also take a look at actual pictures of the fabrics you're trying to create, to get an idea of how the light plays across the surface, and existing shiny clothing recolours, to see how the texturing is done there.

You may also want to read this Elfwood article on making things shiny. It's relating to metal and from a drawing standpoint, but the concepts of "shine" and how to get a realistic effect still apply. It may be helpful in getting you thinking about shininess the right way.

my simblr (sometimes nsfw)

“Dude, suckin’ at something is the first step to being sorta good at something.”
Panquecas, panquecas e mais panquecas.
Test Subject
#17 Old 30th May 2006 at 4:46 AM
Thank you so much HystericalParoxysm! that is a great article. I only hope I can create textures worthy of posting with this info.
Lab Assistant
#18 Old 1st Jun 2006 at 11:59 PM
Woot, awesome tutorial! I'll be making recolors more often now. Thanks!

Look everyone. A signature. <3
Test Subject
#19 Old 8th Jun 2006 at 6:30 AM
Default Easiest way of shading ever!
There's another nice and easy way of shading. I'm not sure how it works for photoshop though. This is for Macromedia Fireworks MX. But if you know how photoshop works, you should get the main idea.

1. Choose the porygon lasso tool. And instead of leaving the edge hard, select the feather mode, change the number in the right from 10 (default) to 30 or above. This will create a more faded selection.

2. Just select the areas you want to highlight and copy them into a new layer. (It would be a nice idea that you keep the pattern/background layer in a 30% or something of transparency, so you can see where the original shadows go)
Repeat the same for the shadows.

3. Now, select the highlights layer, go to add effects. Select Color Adjustments > Curves.
If you move the curve up- left you'll get a lighter version of the background, and if you move it down- right, you'll get a darker version.

4. Just change the colors for each layer. It gets a nice fade ^^

It works for any bitmap, so it's useful for patterns and one color backgrounds.

*** I was a bit lazy with the shading, but if you're more careful on the selections, you'll get a nice result.

*** Look at the pics!!! I liked the result, it looks like a shiny golden top... maybe it needs more contrast, but it looks cool ^^.
Screenshots
Lab Assistant
#20 Old 11th Jun 2006 at 5:05 PM
Very helpful!!! Now my clothes can look a little realer! I'm posting this in my favorites

AKA A_SIMS_ADDICT @S2C >_<
The Flying Spaghetti Monster is REAL

*I'm Retired. But I Hope I'll Be Remember For My Dedication To This Game...."
Test Subject
#21 Old 10th Jul 2006 at 12:55 AM
I'm just a wee novice when it comes to doing recolors and such in photoshop, and trying to figure out all the tools and tricks can be very daunting. This is the most simple and direct tutorial I've seen, and very useful. Thank you.
Field Researcher
#22 Old 19th Jul 2006 at 3:31 PM
OH MAN THANK YOU!!!!! BRILLIANT this will help tons!!!!

*waves hi*
Test Subject
#23 Old 9th Oct 2006 at 6:57 AM
oh wow! thanks, it's amazing how much that simple of a thing can do to change how good your outfit looks!
Test Subject
#24 Old 23rd Dec 2006 at 9:22 PM
I've been trying to do this for years, and every tutorial I've seen just seems impossible but you make it look so easy! Thanks again I love your tutorials!!
I'm glad you use photoshop too hee hee!!
Lab Assistant
#25 Old 1st Apr 2007 at 3:28 PM
Thanks! This is very helpful! :]
Page 1 of 4
Back to top