 Sign in to Mod The Sims
- Site Map >
- Modding and Creation >
- Sims 4 Creation >
- Tutorials >
- Create-A-Sim - Converting a TS3 hair to TS4 using CAS Tools, Milkshape, and GIMP, plus alpha mesh tricks
- Site Map >
- Modding and Creation >
- Sims 4 Creation >
- Tutorials >
- Create-A-Sim - Converting a TS3 hair to TS4 using CAS Tools, Milkshape, and GIMP, plus alpha mesh tricks
Replies: 7 (Who?), Viewed: 23899 times.
#1
 28th Aug 2016 at 8:38 PM
Last edited by CmarNYC : 28th Apr 2017 at 10:58 AM.
28th Aug 2016 at 8:38 PM
Last edited by CmarNYC : 28th Apr 2017 at 10:58 AM.
28th Aug 2016 at 8:38 PM
Last edited by CmarNYC : 28th Apr 2017 at 10:58 AM.
What this tutorial will not do: Teach you the basics of meshing or how to edit textures.
Difficulty level: Intermediate. This is a fairly simple hair but others may present more difficulties.
And a note about using Milkshape - CAS Tools will convert OBJ meshes to TS4 format so you can convert and import a mesh created with another meshing tool. However, CAS Tools does not support modifing a TS4 mesh using the OBJ format so you wouldn't be able to export/tweak/import with anything but Milkshape, but you can export as OBJ, tweak, work with layers, etc., and convert again. The only things you won't be able to modify using obj are bones and uv1.
Tools:
CAS Tools: http://www.modthesims.info/download.php?t=582348
Milkshape 3D (costs $35 with 30 days free trial. I've heard plugins don't work in the trial version, but you can convert TS3 to OBJ with CAS Tools if necessary.):
Sims-related Milkshape plugins: http://www.modthesims.info/showthread.php?t=357403 - download QMeshPlugins.rar and install the .dlls as explained in the program notes.
GIMP with the DDS plugin, Photoshop with the DDS plugin, or Paint.net
CAS Texture Unitool (CTU), s3oc, or another way of extracting meshes and textures from TS3
1) Extract the Sims 3 meshes and textures you want to convert to Sims 4. I used CTU to find the afHairstraightshoulder and clicked the "Extract Meshes" and "Extract Textures" buttons to extract into my working folder. You should have a lod0, lod1, lod2, and lod3 mesh. In this tutorial I'll be converting the lod0 mesh to a TS4 lod0 mesh.
2) Prepare the TS4 resources you'll need. In the CAS Tools 'Cloning Tools' tab, clone an EA TS4 hair to use as the basis for your new hair - it doesn't really matter which one, although if you pick a similar hair you won't have to change as many property tags, and for full compatibility you should pick a basegame hair. Pick a color - I'll pick Gray but it doesn't really matter - give it the name you want to use for your converted hair, and clone. (In the cloning screen you'll notice that many of the hairs are labeled as the opposite gender - ym instead of yf and vise-versa. This is because of the gender-neutral patch, for which many hairs have one version for males and one for females.) You may also want to have the TS4 head mesh available - not totally necessary but I've found this hair at least sits a little high on the TS4 head and you may want to adjust this. I've attached the TS4 head and body meshes for convenience.
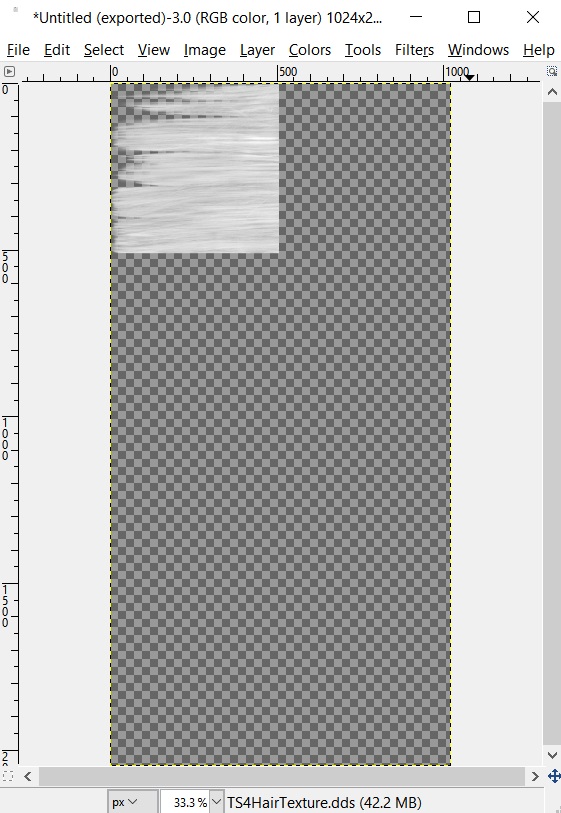
3) Prepare the hair texture. Open the TS4 hair package you cloned and export the texture. (CAS Tools: Clone Package Editor / Recolor Manager - click on the texture thumbnail.) Identify the TS3 texture - it's the one that's a grayscale image of hair on a transparent background. Open both textures in the image editor of your choice. Copy the TS3 image and paste it over the TS4 image as a new layer. Scale the TS3 layer to fit into the upper left corner used by the TS4 hair. Then erase the TS4 hair texture to transparency, merge the layers, and save as DDS-DXT5 generating mipmaps. This gives you a light gray texture that will make problems more obvious than a darker texture would, and which is easy to make recolors from.
You might as well click on the Specular (in the General CAS Part Properties) and the bumpmap (in the General Mesh Manager) and make them blank at this point, since SimGlass meshes don't seem to use speculars or bumpmaps.
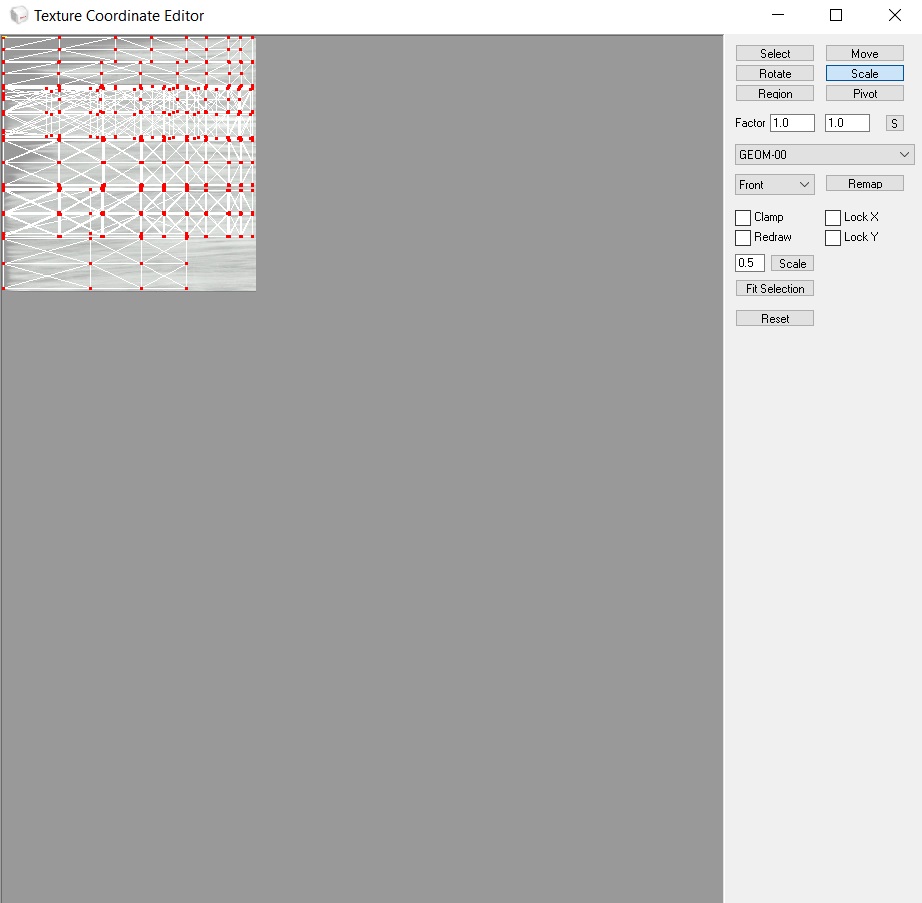
4) Now we're going to adjust the uv mapping of the mesh to match the new texture. Open up Milkshape and import the lod0 TS3 hair mesh. (File/Import/Q-Mesh Sims 3 GEOM Importer V0.16 - By Wesley Howe) Ignore the error message about a missing bone file. In the Groups tab select the group; in the Materials tab click the New button and then the button labelled <none> under the two little sliders and select the new texture you made in the previous step. Click the Assign button. Now go to the Window menu and click Texture Coordinate Editor. In the UV window that pops up, click Scale and scale the mesh coordinates to fit the hair texture. Make sure the textured hair looks okay in the Milkshape preview. (Right-click in the preview window and make sure Textured is selected, Colored Groups is not selected, and Transparency should be set to Depth Buffered with Alpha Transparency.) When done, close the Texture window.
Optionally, you can check the hair placement by bringing in the TS4 head and body - click File, Merge, and select the body ms3d mesh. I've attached the body meshes for convenience. There's also a set of meshes in obj format for users of other meshing programs. I'm going to move the hair just a little bit down to fit better. With longer hairs you may want to adjust how it fits at the shoulders.
When all done, remove the head/body mesh and save the hair as ms3d. You can export it to obj instead if you're not using Milkshape.
5) In CAS Tools, go to the Mesh Tools / Auto Tool: Conversion/Auto Assignments tab. Select the modified hair mesh ms3d (or obj) as the mesh to convert. Set the Part Type, Gender, Age, and LOD selections. If for some reason you're using your own reference mesh you would select that, but in this case we're using the standard. For hair, in many cases it may be best to uncheck the 'Clean Mesh' option at the bottom - that will make a difference when separating the hair layers later on. The default setting for the various other options should be fine in almost all cases, so leave them the way they are. Click Go. It may take a little while, but you'll get a new TS4 mesh.
6. Again in CAS Tools, go to the Clone Package Editor and open your cloned hair if you don't already have it open. In the Mesh Manager tab look in the lower left corner and set the view to 'By Meshpart'. This will expand each lod into its component meshes, for hair they consist of the full hair (lodn_2) and the two meshes with the top chopped to fit with hats. Click on the lod0_2 mesh and click its Import button. Select the converted mesh you created in the previous step. Then click Commit. When you go to the Previewer tab you'll see - a giant mess because it's still using the old TS4 texture. Go to the Recolor Manager sub-tab, click the texture thumnail, and import your modified texture, and click Commit. Now the preview should look better. At this point you can also go to the General CAS Part Properties sub-tab, click the Shadow texture, and make it blank to remove the shadow which is no longer in the right places.
Last, we have to make the mesh use alpha transparency. Go back to the Mesh Manager, click the Shader drop-down for the lod0_2 mesh we imported, and select SimGlass. Click Commit and check the preview again. Click Save to save the package.
7) Now to test in the game! We eagerly select the new hair - and it's got MAJOR transparency issues, mostly from the back.

So let's fix it. First go back to our package in CAS Tools and export the hair mesh in TS4 format. (Mesh Manager - make sure the view is set to By Meshpart - then under the mesh list set the Export Settings to TS4 and click the Export button for the lod0_2 mesh.) Then go to the Mesh Tools tab and in that select the Separate Mesh Layers tab. Select the mesh you just exported. The default settings should work for most meshes, but I'm going to select 'Combine backfaces into one layer' for convenience since we won't be rearranging the backfaces. Click the 'Save to MS3D with Separated Layers' button. (Or Save to OBJ with Separated Layers if you're using another meshing tool.)
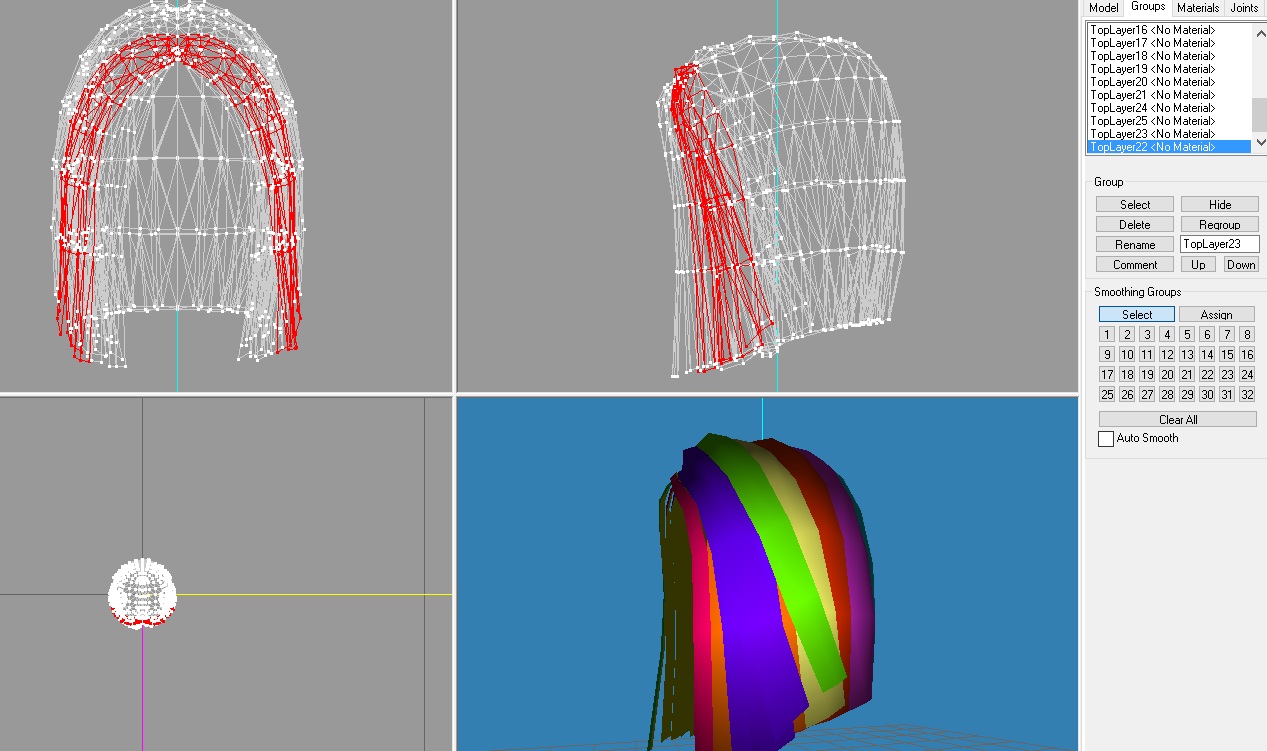
Now open the file you just saved in Milkshape. In the Groups tab you'll see the mesh has been separated into a number of layers - how many will depend on the mesh but in this case it's the one backfaces layer and 25 top layers. In the pic below I have Colored Groups turned on in the 3D viewport.
Note: In practice it may be easier and better to just separate the TS3 mesh into layers - adjust the uv mapping in Milkshape, export it as a TS3 mesh, and run the layer separation on it, then proceed with the rest of this step.
The key to resolving most transparency issues is to rearrange the order of the layers of the hair mesh from inside to outside, bottom to top. Upper layers and to some degree front layers should come lowest in the groups list, IMO meaning they'll be rendered last by the game and therefore layered on top of the other layers. CAS Tools will do its best at finding the lower/back layers first and putting them higher in the groups list, and in some cases you may not have to do any reordering, but sometimes you will. In this case, I'm going to find several layers of top hair that should be on top but aren't (green and purple in the pic), and put them last in the groups list. You can identify the layers by selecting and/or hiding them in the groups list. Personally I find the Colored Groups option in the 3D viewport to be helpful too.
Save the mesh as ms3d - no regrouping - then do the conversion to TS4 the same way as before except it's best to check the Clean Mesh option. This time it will ask you if you want to convert the groups to one TS4 mesh - make sure that option is selected and click Convert.
Import the new mesh in the CAS Tools mesh manager, change the shader to SimGlass, save the package, and test in game. This is the hardest part of the process - you may have to go back and forth several times, cleaning or not cleaning the mesh, arranging layers in different ways. It's tedious but has to be done to resolve most of the transparency issues.
Note: Besides stuff showing through where it shouldn't, if you get weird glitching in the texture that may be due to the layer separation not separating enough layers, and you may have to go back and use the TS3 mesh or try converting with the Clean option turned off. If all else fails, try going back to the original TS3 mesh before you adjusted the uv and separate the layers on that. After you convert it to TS4 you can convert that into an ms3d with only one group using CAS Tools: Mesh Tools / Conversions: TS4/other tab. Adjust the uv on that and convert it back to TS4 in the Auto Tool tab.
8) Okay, we've gotten most of the transparency working, except for the hair at the crown of the head where the part shows through no matter what you do. Now for the last trick in CAS Tools' transparency inventory: Adding a non-transparent mesh to the hair to prevent see-though in places it can't be prevented otherwise.
In Milkshape, open the final hair mesh. If you want to do it really right, use the layered hair mesh and delete all the groups except the top layers, including the backfaces. This isn't as hard as it sounds: if you have the layers in the right order you can just keep deleting from the top of the groups list until you see a hole in the mesh, and then undo to get the missing parts back. Next, select and delete the lower part of the mesh, leaving just a 'cap' for the top of the head. For this hair I'm making it a bit shorter for those front little strands of hair because the non-transparent mesh will be more visible against the sim's face. Do a 'Save As' to save it separately from your full layered hair.
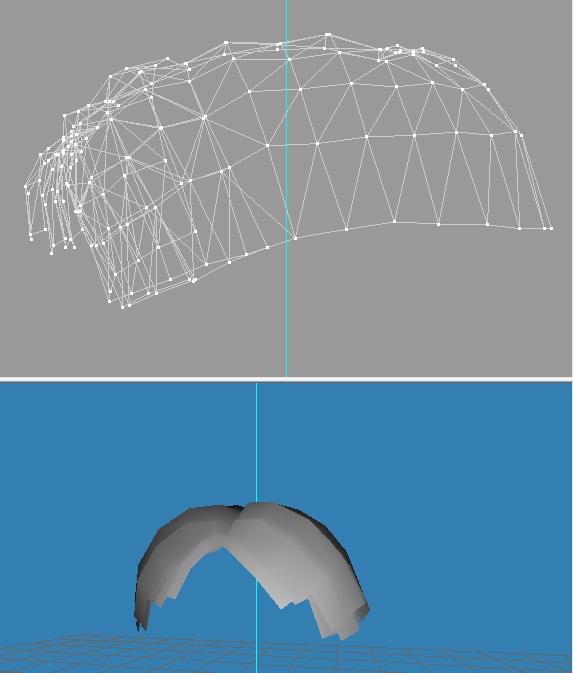
Now run that ms3d mesh through the CAS Tools Auto Tool Conversion to TS4 just like the full hair mesh. When that's done and you have a TS4 mesh, go back to the Clone Package Editor / Mesh Manager. Near the upper right click the Add New Mesh button. A window will pop up asking for the mesh and the LOD, layer, and region(s). Select your new mesh. For other CAS parts you'll have to know the proper region and layer from looking at EA items, but hairs are complicated so there are handy buttons to set up hair meshes. Click the 'Full Hair' button and it will fill in the needed information. Then click the Save button and click Yes when it asks 'Commit changes now?'. You'll see that the new mesh has been added in the mesh list. Leave its shader as SimSkin. Save, preview, and test in-game.
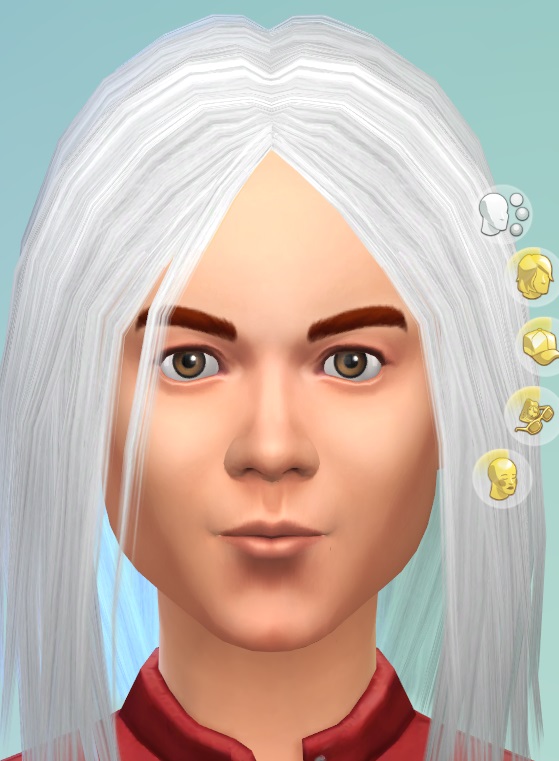
One difficulty with this method is that parts in the mesh that were meant to be transparent are now opaque and will show the skin color. You may have to adjust the opaque mesh, the uv mapping on it, and/or the texture to compensate for this. I had to do all three for this hair. It can be tricky, but if you change the skin color to something very visible the CAS Tools previewer will be very helpful.
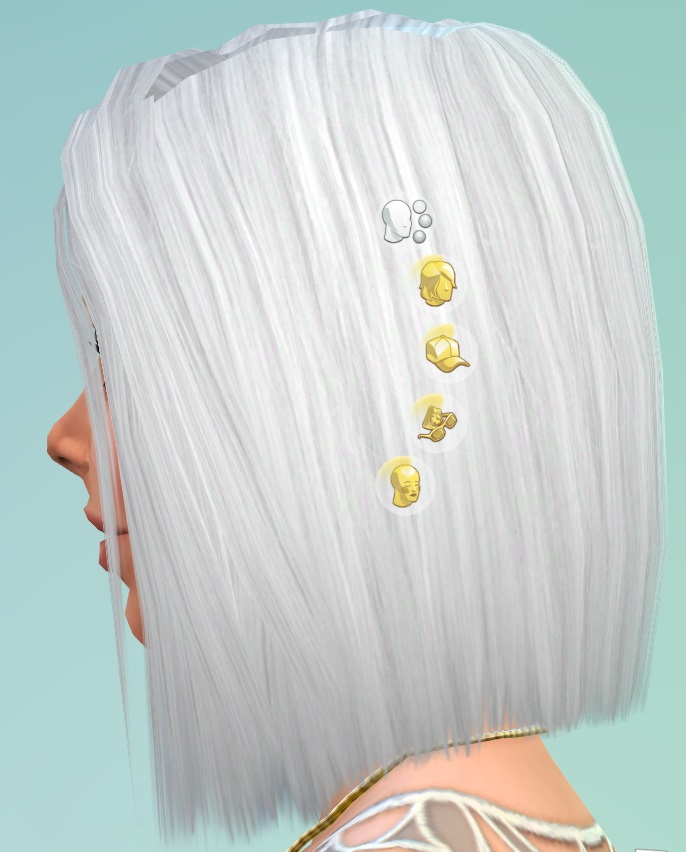
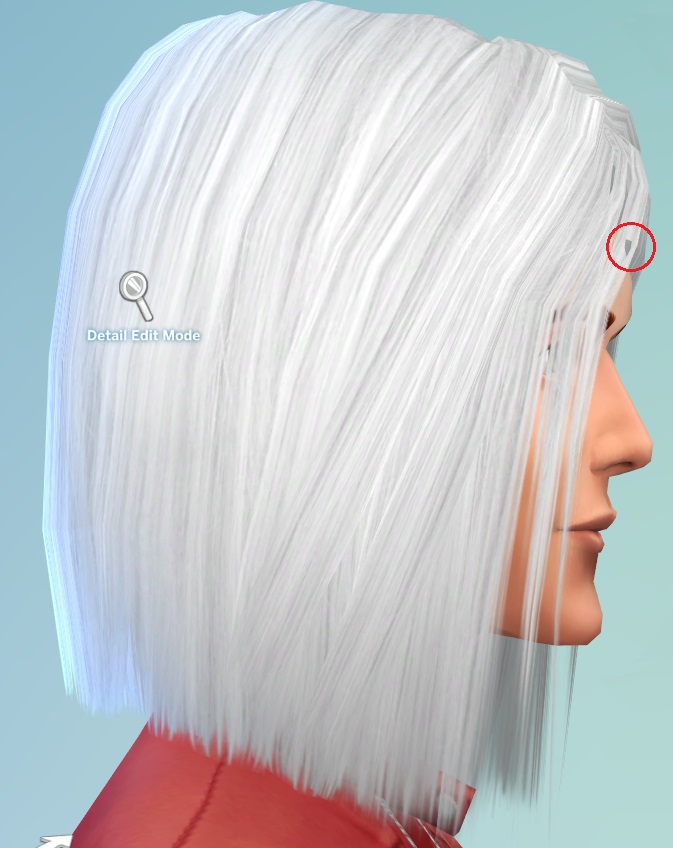
The only glitches left that I can see are the little spot in the front strands circled below and the way light shines through the back of the hair (less visible in-game and with darker hair) and glasses will show though it, which I think are unavoidable when dealing with the SimGlass shader. Also, if a sim has big ears they'll stick through so I should widen the mesh a little.
Obviously the lower lods and hat cuts still have to be done!
Final notes: Hairs made this way will have breast and fat/fit/thin/bony morphs, but hair that's much longer than the long TS4 hair I used as a default reference may have some morph glitches - I haven't tried any. Also hair that spreads over the shoulders will probably have to have bone assignments in that area adjusted manually to avoid clipping. Some hairs may need you to find a similar game mesh to use as a reference instead of the standard one built into CAS Tools - possibly long hair for men will need this since I saw some distortion around the shoulders in a long hair I converted and tried on a male. And of course, different meshes will present their own unique problems.
Attached files:
| Reference meshes and textures.7z (5.06 MB, 286 downloads) - View custom content | ||
   Date      Time    Attr         Size   Compressed  Name
------------------- ----- ------------ ------------  ------------------------
2016-08-28 12:37:12 ....A       652039      5303861  ChildBodyCompleteUV0.jpg
2016-08-28 13:22:43 ....A       930486               ChildBodyCompleteUV1.jpg
2016-08-28 15:39:16 ....A       216383               ChildSkin.jpg
2016-07-23 13:06:02 ....A       650367               FemaleBodyCompleteUV0.jpg
2016-08-28 12:34:37 ....A       946585               FemaleBodyCompleteUV1.jpg
2016-08-28 15:40:00 ....A       217718               FemaleSkin.jpg
2016-08-28 12:39:03 ....A       652142               MaleBodyCompleteUV0.jpg
2016-08-28 12:35:20 ....A       928295               MaleBodyCompleteUV1.jpg
2016-08-28 15:39:40 ....A       188601               MaleSkin.jpg
2016-08-28 12:47:58 ....A       693101               cuBodyCompleteLOD0.obj
2016-08-28 13:10:53 ....A       344061               cuBodyCompleteLOD1.obj
2016-08-28 13:15:00 ....A       193397               cuBodyCompleteLOD2.obj
2016-08-28 13:17:58 ....A       113425               cuBodyCompleteLOD3.obj
2016-08-28 12:50:13 ....A       709601               yfBodyCompleteLOD0.obj
2016-08-28 13:39:25 ....A       348026               yfBodyCompleteLOD1.obj
2016-08-28 13:41:51 ....A       195949               yfBodyCompleteLOD2.obj
2016-08-28 13:44:13 ....A       111743               yfBodyCompleteLOD3.obj
2016-08-28 12:53:57 ....A       690465               ymBodyCompleteLOD0.obj
2016-08-28 13:29:05 ....A       343277               ymBodyCompleteLOD1.obj
2016-08-28 13:32:14 ....A       190626               ymBodyCompleteLOD2.obj
2016-08-28 13:34:48 ....A       110997               ymBodyCompleteLOD3.obj
2016-08-28 12:47:28 ....A       742714               cuBodyCompleteLOD0.ms3d
2016-08-28 13:10:34 ....A       406174               cuBodyCompleteLOD1.ms3d
2016-08-28 13:14:45 ....A       261345               cuBodyCompleteLOD2.ms3d
2016-08-28 13:17:43 ....A       182562               cuBodyCompleteLOD3.ms3d
2016-08-28 12:50:25 ....A       752421               yfBodyCompleteLOD0.ms3d
2016-08-28 13:38:59 ....A       402674               yfBodyCompleteLOD1.ms3d
2016-08-28 13:41:30 ....A       258162               yfBodyCompleteLOD2.ms3d
2016-08-28 13:44:53 ....A       174683               yfBodyCompleteLOD3.ms3d
2016-08-28 12:53:41 ....A       735122               ymBodyCompleteLOD0.ms3d
2016-08-28 13:26:27 ....A       397511               ymBodyCompleteLOD1.ms3d
2016-08-28 13:32:00 ....A       252653               ymBodyCompleteLOD2.ms3d
2016-08-28 13:34:31 ....A       173986               ymBodyCompleteLOD3.ms3d
------------------- ----- ------------ ------------  ------------------------
                              14167291      5303861  33 files, 0 folders
|
||
Please do not PM me with mod, tutorial, or general modding questions or problems; post them in the thread for the mod or tutorial or post them in the appropriate forum.
Visit my blogs for other Sims content:
Online Sims - general mods for Sims 3
Offline Sims - adult mods for Sims 3 and Sims 4
3 users say thanks for this.
(Who?)
Thanks
Advertisement
#2
1st Sep 2016 at 6:28 PM
1st Sep 2016 at 6:28 PM
Posts: 30
so cool!!!! thanks!!!
Test Subject
#3
20th Feb 2017 at 4:15 AM
20th Feb 2017 at 4:15 AM
Posts: 51
Please, I'm having problems with transparencies. Make a video, it would be much better! I would thank you for the rest of my life.
#4
20th Feb 2017 at 8:29 PM
20th Feb 2017 at 8:29 PM
Quote: Originally posted by thiagomichel
| Please, I'm having problems with transparencies. Make a video, it would be much better! I would thank you for the rest of my life. |
I'm sorry, but I don't do videos - that's why I included so many pictures. It might not help you with your specific problems, anyway. If you have questions or problems, please ask here.
Please do not PM me with mod, tutorial, or general modding questions or problems; post them in the thread for the mod or tutorial or post them in the appropriate forum.
Visit my blogs for other Sims content:
Online Sims - general mods for Sims 3
Offline Sims - adult mods for Sims 3 and Sims 4
Test Subject
#5
27th Apr 2017 at 7:28 AM
27th Apr 2017 at 7:28 AM
Posts: 40
Can this method also be used to convert hair from other games (imvu, second life etc.,) and to convert to different age groups?
#6
28th Apr 2017 at 10:54 AM
28th Apr 2017 at 10:54 AM
Quote: Originally posted by kamikazewolf
| Can this method also be used to convert hair from other games (imvu, second life etc.,) and to convert to different age groups? |
Well, sort of, maybe. If the hair can be extracted to .obj the same general method should work, but each game will offer its own challenges. Conversion to different ages mostly involves scaling, moving, and reshaping a mesh to fit AFAIK, so should be a simpler process at least in the technical sense.
Please do not PM me with mod, tutorial, or general modding questions or problems; post them in the thread for the mod or tutorial or post them in the appropriate forum.
Visit my blogs for other Sims content:
Online Sims - general mods for Sims 3
Offline Sims - adult mods for Sims 3 and Sims 4
Field Researcher
#7
9th Dec 2021 at 7:14 AM
9th Dec 2021 at 7:14 AM
Posts: 267
I know this is an old, old thread, but I have a question about this tutorial. I'm more comfortable with Blender and Sims4Studio. Is it possible to use these applications? Sims4Studio does pretty much what CAS Tools does (I think), and I can UV map and assign weights in Blender. For these last two—UV mapping and weighting—I'm used to working with Blender for that though I understand you can assign weights in Milkshape. I just prefer not to.
#8
30th Jan 2022 at 8:30 AM
30th Jan 2022 at 8:30 AM
Quote: Originally posted by mirabellarose
| I know this is an old, old thread, but I have a question about this tutorial. I'm more comfortable with Blender and Sims4Studio. Is it possible to use these applications? Sims4Studio does pretty much what CAS Tools does (I think), and I can UV map and assign weights in Blender. For these last two—UV mapping and weighting—I'm used to working with Blender for that though I understand you can assign weights in Milkshape. I just prefer not to. |
Of course - the game doesn't care what tools were used and most of the steps should translate to S4S and Blender pretty easily. You'd have to transfer weights and uv1 in Blender of course. I don't think S4S has an easy way to add an additional mesh part although I think I've seen some instructions for doing it manually. And I know it has no way to separate mesh layers so you'd have to do that manually as well.
Please do not PM me with mod, tutorial, or general modding questions or problems; post them in the thread for the mod or tutorial or post them in the appropriate forum.
Visit my blogs for other Sims content:
Online Sims - general mods for Sims 3
Offline Sims - adult mods for Sims 3 and Sims 4
Who Posted
|
|