 Sign in to Mod The Sims
 5 EA Glasses with Recolourable Lenses for Teen to Elder
 5 EA Glasses with Recolourable Lenses for Teen to Elder
MTS has all free content, all the time. Donate to help keep it running.
SCREENSHOTS


Rectangle shades + halfrim glasses.jpg - width=869 height=576
designer glasses x2.jpg - width=823 height=576
halfrim shades + senior shades.jpg - width=810 height=552
HowToSetIntensityOnShades.jpg - width=1080 height=610
newthumb.jpg - width=652 height=621
Created by Esmeralda
Uploaded: 10th Aug 2012 at 8:48 PM
Updated: 15th Aug 2012 at 10:04 AM by EsmeraldaF - Just change of thumbnail pic
Updated: 15th Aug 2012 at 10:04 AM by EsmeraldaF - Just change of thumbnail pic
Here is a set of five EA base game glasses and sunglasses modified to have recolourable lenses. I chose these particular ones, and whether to make them clear or sunglasses, because they were the ones that looked the best with the modifications, and the modifications really do make these glasses more attractive and versatile. They do not replace the original versions.
They are all enabled for both male and female, and are for Teen to Elder. They're in the Glasses section in CAS, and you can quickly tell which have the clear lenses and which have the sunglass lenses because the caption on the thumbnail is in red print for the clear lenses, and in green for the sunglasses.
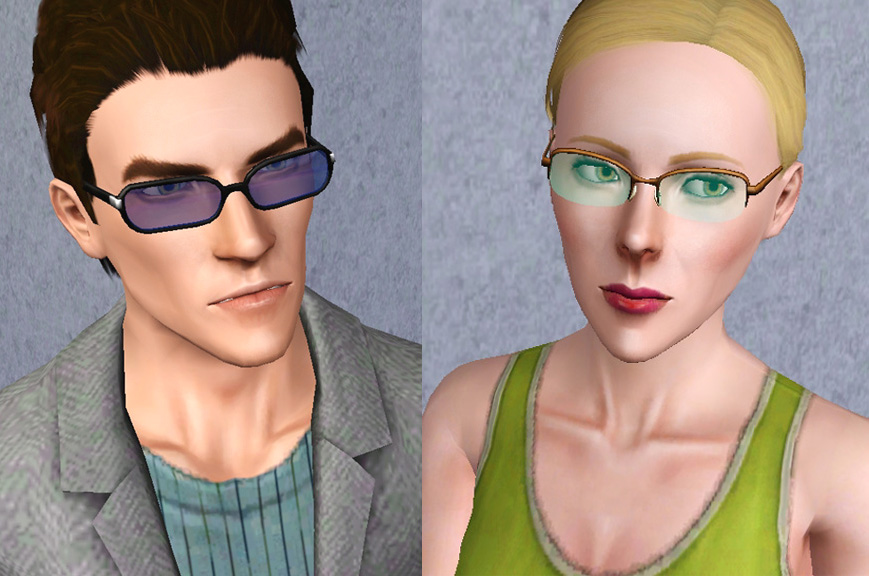
First, the Rectangle glasses as sunglasses, and the Half-Rim glasses as clear lenses:

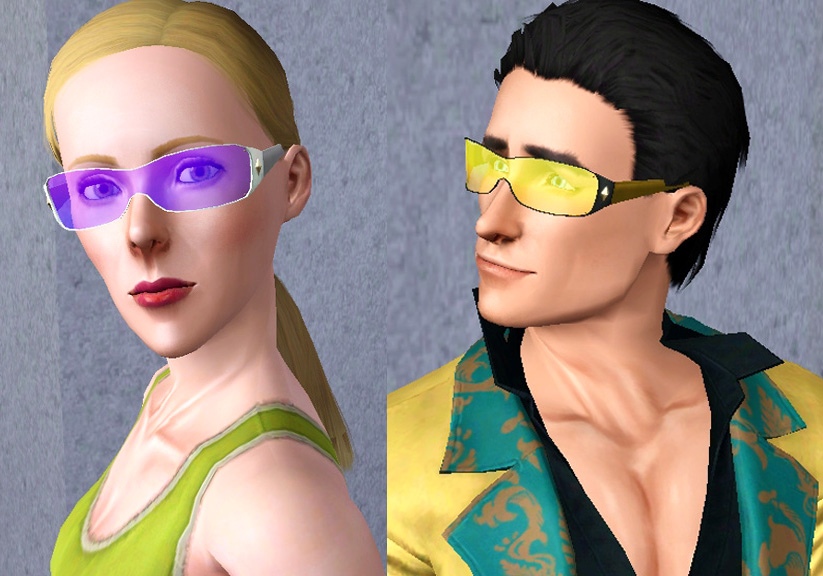
The Designer glasses were originally only for ladies, but I find they make a good set of specs for your more flashy and blingy male sims, say with gold lenses and black trim as below, so they are now enabled for both:
And next, the Half-Rims as sunglasses and the Senior Shades with recolourable lenses. I never particularly liked the Senior Shades, but now find that they look actually quite good with colour lenses:
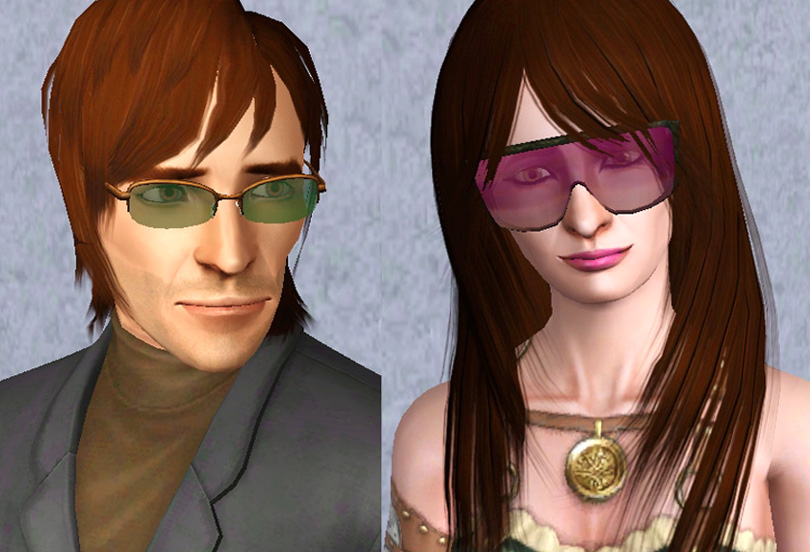
(Female model's hair in above pic is by XM Sims: http://www.xmsims.com/sims3/ehtm/fhair/fhair007.html )
HOW TO RECOLOUR THE LENSES:
There are two different techniques depending on whether the lenses are clear or shades.
For the clear glasses, the strongest colour is obtained by setting the brightness slider in CaST all the way to the left (brightest) and the colour to its strongest and most saturated. The further to the right you move the brightness slider, the more the colour will fade. The clear Half-Rims only have a delicate tint, so you will probably want to just keep it on the brightest setting, while the Designers take a stronger tint and you can adjust that to your liking.
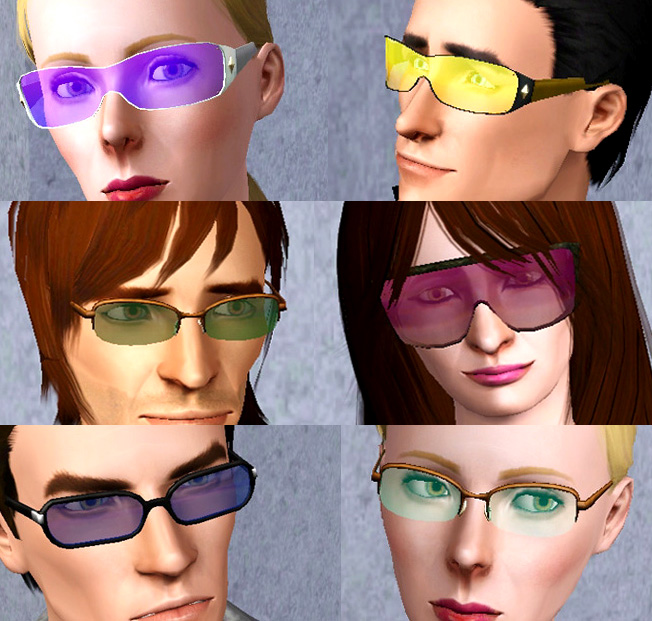
For the shades, they have an interesting versatile effect depending on where you place the brightness slider. To use them as regular shades, set the brightness slider to almost, but not full, black, just so that the colour still shows. If you move the slider to the left, the lenses will start to take on a glow-in-the-dark effect and will become more opaque and shiny in daylight as well. In the pic below, you can see how the different slider settings affect the glow. This can make the shades useful for Sci-Fi types of sims as well as regular humans - looks particularly good on the Senior Shades as below.

UPDATE: I've now also added recolourable clear versions to my Frameless Rectangular Glasses http://www.modthesims.info/d/382029 and my Small Round Glasses http://www.modthesims.info/d/443662 . Both of these are a light tint effect like the clear Half-Rims above.
Thank you for looking, hope you'll find these useful!
INSTALL INSTRUCTIONS:
Unzip the .zip file(s), and copy the .package file(s) to your Mods\Packages folder. For each item, you only need the one file for both men and women, as it is enabled for both.
If you don't have a Mods\Packages folder and/or don't know how to install .package files, please see full instructions here: http://www.modthesims.info/wiki.php...g_Package_Files
Polygon Counts:
Total count for frames + lenses:
Half-rims 798
Rectangle 742
Designer 756
Senior 550
Additional Credits:
Made with CAS Texture Unitool http://www.modthesims.info/d/364926
Thanks to EA for the Showtime helmet with the recolourable visor, the examination of which enabled me to finally figure out how to make recolourable lenses
They are all enabled for both male and female, and are for Teen to Elder. They're in the Glasses section in CAS, and you can quickly tell which have the clear lenses and which have the sunglass lenses because the caption on the thumbnail is in red print for the clear lenses, and in green for the sunglasses.
First, the Rectangle glasses as sunglasses, and the Half-Rim glasses as clear lenses:
The Designer glasses were originally only for ladies, but I find they make a good set of specs for your more flashy and blingy male sims, say with gold lenses and black trim as below, so they are now enabled for both:
And next, the Half-Rims as sunglasses and the Senior Shades with recolourable lenses. I never particularly liked the Senior Shades, but now find that they look actually quite good with colour lenses:
(Female model's hair in above pic is by XM Sims: http://www.xmsims.com/sims3/ehtm/fhair/fhair007.html )
HOW TO RECOLOUR THE LENSES:
There are two different techniques depending on whether the lenses are clear or shades.
For the clear glasses, the strongest colour is obtained by setting the brightness slider in CaST all the way to the left (brightest) and the colour to its strongest and most saturated. The further to the right you move the brightness slider, the more the colour will fade. The clear Half-Rims only have a delicate tint, so you will probably want to just keep it on the brightest setting, while the Designers take a stronger tint and you can adjust that to your liking.
For the shades, they have an interesting versatile effect depending on where you place the brightness slider. To use them as regular shades, set the brightness slider to almost, but not full, black, just so that the colour still shows. If you move the slider to the left, the lenses will start to take on a glow-in-the-dark effect and will become more opaque and shiny in daylight as well. In the pic below, you can see how the different slider settings affect the glow. This can make the shades useful for Sci-Fi types of sims as well as regular humans - looks particularly good on the Senior Shades as below.
UPDATE: I've now also added recolourable clear versions to my Frameless Rectangular Glasses http://www.modthesims.info/d/382029 and my Small Round Glasses http://www.modthesims.info/d/443662 . Both of these are a light tint effect like the clear Half-Rims above.
Thank you for looking, hope you'll find these useful!
INSTALL INSTRUCTIONS:
Unzip the .zip file(s), and copy the .package file(s) to your Mods\Packages folder. For each item, you only need the one file for both men and women, as it is enabled for both.
If you don't have a Mods\Packages folder and/or don't know how to install .package files, please see full instructions here: http://www.modthesims.info/wiki.php...g_Package_Files
Polygon Counts:
Total count for frames + lenses:
Half-rims 798
Rectangle 742
Designer 756
Senior 550
Additional Credits:
Made with CAS Texture Unitool http://www.modthesims.info/d/364926
Thanks to EA for the Showtime helmet with the recolourable visor, the examination of which enabled me to finally figure out how to make recolourable lenses
This is a new mesh, and means that it's a brand new self contained object that usually does not require a specific Pack (although this is possible depending on the type). It may have Recolours hosted on MTS - check below for more information.
| Filename | Size | Downloads | Date | |||||
|
EsmeraldaF_EAShadesSeniorRecolourableM+F,T-E.zip
Size: 59.9 KB · Downloads: 6,237 · 10th Aug 2012 |
59.9 KB | 6,237 | 10th Aug 2012 | |||||
|
EsmeraldaF_EAShadesRectangleRecolourableM+F,T-E.zip
Size: 66.1 KB · Downloads: 6,907 · 10th Aug 2012 |
66.1 KB | 6,907 | 10th Aug 2012 | |||||
|
EsmeraldaF_EAShadesHalf-RimRecolourableM+F,T-E.zip
Size: 64.1 KB · Downloads: 6,649 · 10th Aug 2012 |
64.1 KB | 6,649 | 10th Aug 2012 | |||||
|
EsmeraldaF_EAGlassesHalf-RimRecolourableM+F,T-E.zip
Size: 66.7 KB · Downloads: 6,903 · 10th Aug 2012 |
66.7 KB | 6,903 | 10th Aug 2012 | |||||
|
EsmeraldaF_EAGlassesDesignerRecolourableM+F,T-E.zip
Size: 70.2 KB · Downloads: 7,526 · 10th Aug 2012 |
70.2 KB | 7,526 | 10th Aug 2012 | |||||
| For a detailed look at individual files, see the Information tab. | ||||||||
Key:
- - File was updated after upload was posted
Install Instructions
Quick Guide:
1. Click the file listed on the Files tab to download the file to your computer.
2. Extract the zip, rar, or 7z file. Now you will have either a .package or a .sims3pack file.
For Package files:
1. Cut and paste the file into your Documents\Electronic Arts\The Sims 3\Mods\Packages folder. If you do not already have this folder, you should read the full guide to Package files first: Sims 3:Installing Package Fileswiki, so you can make sure your game is fully patched and you have the correct Resource.cfg file.
2. Run the game, and find your content where the creator said it would be (build mode, buy mode, Create-a-Sim, etc.).
For Sims3Pack files:
1. Cut and paste it into your Documents\Electronic Arts\The Sims 3\Downloads folder. If you do not have this folder yet, it is recommended that you open the game and then close it again so that this folder will be automatically created. Then you can place the .sims3pack into your Downloads folder.
2. Load the game's Launcher, and click on the Downloads tab. Find the item in the list and tick the box beside it. Then press the Install button below the list.
3. Wait for the installer to load, and it will install the content to the game. You will get a message letting you know when it's done.
4. Run the game, and find your content where the creator said it would be (build mode, buy mode, Create-a-Sim, etc.).
Extracting from RAR, ZIP, or 7z: You will need a special program for this. For Windows, we recommend 7-Zip and for Mac OSX, we recommend Keka. Both are free and safe to use.
Need more help?
If you need more info, see:
- For package files: Sims 3:Installing Package Fileswiki
- For Sims3pack files: Game Help:Installing TS3 Packswiki
Also Thanked - Users who thanked this download also thanked:
Packs Needed
None, this is Sims 3 base game compatible!
Other Information
Accessory Type:
– Glasses
– Sunglasses
Age:
– Teen
– Young Adult
– Adult
– Elder
Maxis Flags:
– Not Applicable
Gender:
– Male
– Female
Tags
#glasses, #sunglasses, #shades, #recolorable, #recolourable, #lenses
About Me
Retired from The Sims for now but I'll still check for questions or PMs. Thank you to those who liked my Sims stuff, love all of you. My Fallout 4 mods: https://www.nexusmods.com/fallout4/...?tab=user+files and https://colorfulcommonwealth.proboards.com/ which also has Sims mods not uploaded here, plus tutorials on making Fallout 4 and Starfield cc. Currently figuring out Starfield cc creation.
MY POLICY: I'm easygoing, please just don't copy my creations or claim them to be your own work. You may include my creations with your sims or lots, just credit me with a link back to the item.
MY POLICY: I'm easygoing, please just don't copy my creations or claim them to be your own work. You may include my creations with your sims or lots, just credit me with a link back to the item.
More Downloads BETA
Here are some more of my downloads: