 Sign in to Mod The Sims
- Site Map >
- Modding and Creation >
- Sims 3 Creation >
- Meshing >
- Blender - Help Fixing my UV Map/Texture
- Site Map >
- Modding and Creation >
- Sims 3 Creation >
- Meshing >
- Blender - Help Fixing my UV Map/Texture
 23rd Aug 2011 at 5:25 PM
Posts: 37
Thanks: 4549 in 14 Posts
I'm trying to learn how to create objects in blender, and I've got it pretty much down. I've been able to get my object into the game, and the mesh itself looks great, and everything works properly, but I keep having an issue with my texture.
No matter what I try, It always comes out looking like I didn't map it (see attachment). I've done all the mapping work in blender, made sure to edit the dds images to fit the map, and I get no errors anywhere in the blender process. Everything looks perfect in Blender. I'm pretty sure something is wrong with the UV map, like I'm missing a step somewhere, but I have no idea what it is. Everything I try still gets me back to this problem.
Anyone know how to fix this? -Thanks!
24th Aug 2011 at 12:12 AM
Posts: 2,932
Thanks: 15574 in 28 Posts
|
Hi, I'm trying to learn how to create objects in blender, and I've got it pretty much down. I've been able to get my object into the game, and the mesh itself looks great, and everything works properly, but I keep having an issue with my texture. No matter what I try, It always comes out looking like I didn't map it (see attachment). I've done all the mapping work in blender, made sure to edit the dds images to fit the map, and I get no errors anywhere in the blender process. Everything looks perfect in Blender. I'm pretty sure something is wrong with the UV map, like I'm missing a step somewhere, but I have no idea what it is. Everything I try still gets me back to this problem. Anyone know how to fix this? -Thanks! |
24th Aug 2011 at 1:06 AM
Posts: 37
Thanks: 4549 in 14 Posts
24th Aug 2011 at 1:17 AM
Posts: 2,932
Thanks: 15574 in 28 Posts
| I don't think so. I just went and edited my specular to be blank, and it still looks the same. |
24th Aug 2011 at 1:41 AM
Posts: 37
Thanks: 4549 in 14 Posts

I still think it might be a problem with my UV mapping, because when I look at the surface of my table, I can see a squashed version of my multiplier image there. It's like the whole image is being plastered onto the surface because there's no map to tell it what parts go where.
24th Aug 2011 at 2:23 AM
Posts: 1,740
Thanks: 107797 in 53 Posts
| (• ◡•)| (❍ᴥ❍ʋ) [◕ ‿ ◕]
24th Aug 2011 at 2:37 AM
Posts: 2,932
Thanks: 15574 in 28 Posts
24th Aug 2011 at 2:47 AM
Posts: 37
Thanks: 4549 in 14 Posts
As I understand it, the edge split modifier basically duplicates edges on the mesh that are split on the map, right? If that's what's supposed to happen, it seems I did it right.
24th Aug 2011 at 3:26 AM
Posts: 1,740
Thanks: 107797 in 53 Posts
| (• ◡•)| (❍ᴥ❍ʋ) [◕ ‿ ◕]
24th Aug 2011 at 4:20 AM
Posts: 37
Thanks: 4549 in 14 Posts
| ladymumm_AngularTable.rar (77.8 KB, 11 downloads) - View custom content | ||||||||||
                  Size   Packed Ratio  Date   Time     Attr      CRC   Meth Ver
-------------------------------------------------------------------------------
 ladymumm_AngularTable.package
                130805    79618  60% 23-08-11 20:17  .....A.   23443DF3 m5b 2.9
-------------------------------------------------------------------------------
    1           130805    79618  60%
|
||||||||||
24th Aug 2011 at 5:02 AM
Posts: 1,740
Thanks: 107797 in 53 Posts
| (• ◡•)| (❍ᴥ❍ʋ) [◕ ‿ ◕]
24th Aug 2011 at 5:36 AM
Posts: 37
Thanks: 4549 in 14 Posts
24th Aug 2011 at 7:10 PM
Posts: 37
Thanks: 4549 in 14 Posts
24th Aug 2011 at 7:37 PM
Posts: 1,740
Thanks: 107797 in 53 Posts
| (• ◡•)| (❍ᴥ❍ʋ) [◕ ‿ ◕]
24th Aug 2011 at 9:15 PM
Posts: 37
Thanks: 4549 in 14 Posts
| AngularTable.rar (48.4 KB, 6 downloads) - View custom content | ||
                  Size   Packed Ratio  Date   Time     Attr      CRC   Meth Ver
-------------------------------------------------------------------------------
 AngularTable.blend
                326496    49490  15% 24-08-11 13:13  .....A.   CBC8354D m5d 2.9
-------------------------------------------------------------------------------
    1           326496    49490  15%
|
||
24th Aug 2011 at 11:55 PM
Posts: 1,740
Thanks: 107797 in 53 Posts
| (• ◡•)| (❍ᴥ❍ʋ) [◕ ‿ ◕]
25th Aug 2011 at 12:00 AM
Posts: 37
Thanks: 4549 in 14 Posts
20th Sep 2011 at 2:32 PM
Posts: 113
Thanks: 1371 in 11 Posts
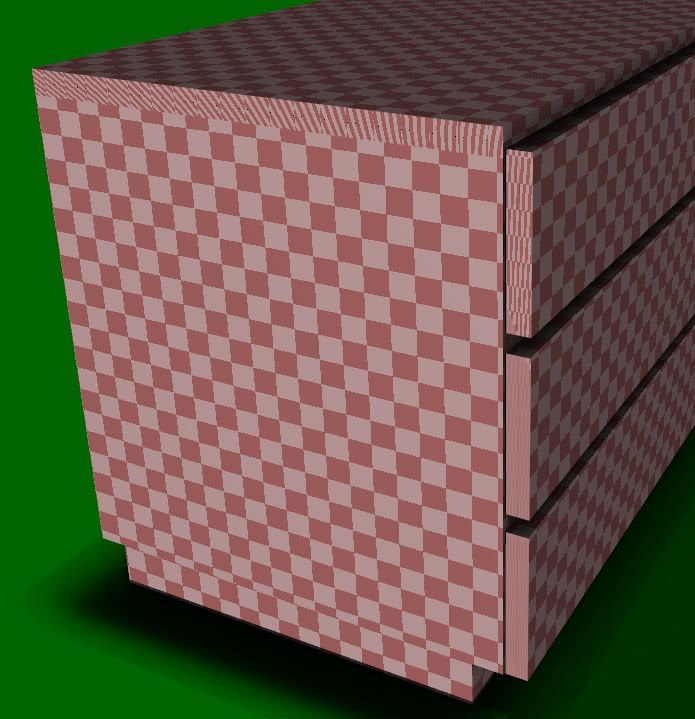
Look at the images below. On the left I have generated the UV map with cube projection and then rearranged it. On the right is the same map without arranging. Previews are from TSRW.
For this particular object I generated the UV map first and exported to TSRW to see that the mapping is correct. After that I arranged the parts in the generated map, and it stopped working. After that I went back to Blender and regenerated the UV map and BAM, its working again.
Pity that the default mapping won't do for this object. How do I fix this?
I have tried most of the mapping options that Blender has. Unwrapping and smart projection both result in borked mapping. At worst I have had 3-4 faces messed up like this.
If I import the exported mesh back to Blender, the UV map looks ok, it does not distort like it does when edges are not splitted right.
20th Sep 2011 at 4:24 PM
Posts: 1,740
Thanks: 107797 in 53 Posts
This is the way I do it. It's not the conventional way to unwrap meshes, but it works for the game.
Also, when I say 'apply' a modifier, that is different from just 'adding' a modifier. When you add a modifier, it shows you the resulting changes to the mesh, but no changes are actually made. It isn't until you press 'apply'(in Object mode) in the modifier that the mesh gets changed.
| (• ◡•)| (❍ᴥ❍ʋ) [◕ ‿ ◕]
20th Sep 2011 at 7:23 PM
Posts: 113
Thanks: 1371 in 11 Posts
I got it working doing the mapping like you explained. But then I noticed that one of the table legs was against the wood grain, went back to mapping and rotated that island. After that I had the same problem again. Lucky me, I had the working version saved.
It's not perfect, but the glitch is now so small that no-one will notice and most of the wood textures do not have noticeable grain direction anyway.
All the splitted edges are the same as they were in my original version (I tested all my splits by moving the faces), but I originally UV mapped using marked seams and afterwards used Mark Sharp and made the Edge Split for all parts using those sharp marks (not angles). I did not realize there could be a difference between the Edge Split and just splitting with Y. Splitting all edges with Edge Split and then constructing the UV map did not work either.
I updated my workflow in Blender Tools thread so that next newbie hopefully does not make the same mistakes.
30th Sep 2011 at 6:22 PM
Posts: 113
Thanks: 1371 in 11 Posts
This one was almost ready, but then I noticed that the texture was a bit blurred and wanted to allocate more space for the table top in the UV map. Couple of resizes, rotates and graps - and here we go again!
 30th Sep 2011 at 6:52 PM
Posts: 1,740
Thanks: 107797 in 53 Posts

| (• ◡•)| (❍ᴥ❍ʋ) [◕ ‿ ◕]
30th Sep 2011 at 8:49 PM
Posts: 4,419
Thanks: 2483 in 21 Posts
1st Oct 2011 at 2:26 AM
Posts: 466
Thanks: 9896 in 9 Posts
I suggest you try UV mapper, it's free and does a great job, but you would need to UV map your mesh by hand.
Meshes in the Sims 3 need to be UV mapped separately, not like in the Sims 2, where you would have gotten away with mapping it like you did above.
You can find more of my stuff here: http://www.blackpearlsims.com/downloads.php
1st Oct 2011 at 8:14 AM
Posts: 113
Thanks: 1371 in 11 Posts
I actually already released this object for testing, you can see in that thread how the mapping and textures looked before the change: http://www.modthesims.info/showthread.php?t=456657
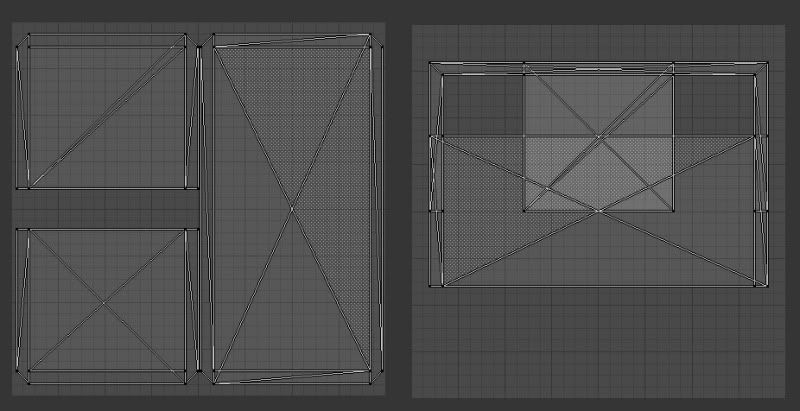
Here are the maps for the Muurame unit (3-drawers):

On the left is the one that works, on the right is the one that does not. All I did was to re-arrange the parts - I did no remap anything.
I did the changes, because patterns looked a bit stretched in the game. Then I found this explanation by Cyclonesue about how the part of the object needs to use a part in the UV map that is relative to its size in game: What size should my textures be. So, I figured out that as the drawer width is one tile, it's width in map should be near to 256 pixels for patterns to show correctly. And they did - but with "benefits" of borked sides.
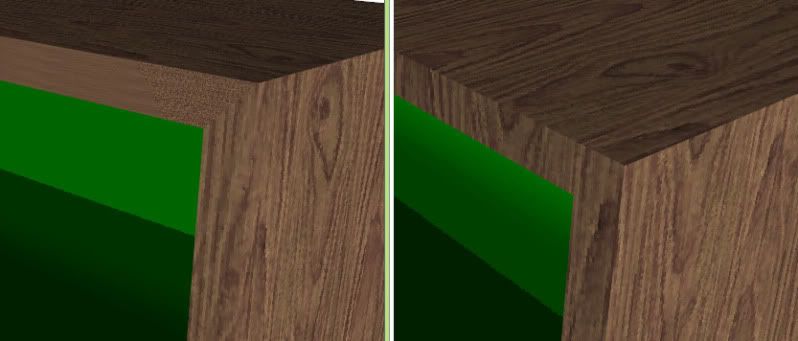
And here is the same situation for the woodblock table (that was shown in my previous post in this thread):

Again, the one on the left works, the one on the right does not work.
Here I did the change because I noticed that the original mapping was unbakable (because the table top and downside overlap), plus the wood grain did not align nicely at the end of the table. In the new mapping it would also have been easier to draw in some edge highlights in multiplier.
I must say that I prefer the clean look of the leftmost mapping of the Muurame drawers and if there is a way to fix the things that I need fixed without changing the UV map, I'd love to learn it. Maybe I need to start with a bigger object, that comes with a 512x512 multiplier?
Anyway, I am sick and tired of redoing my UV maps over and over again. I should be able to put the parts on top of each other, right? I should be able to rotate the islands and change their position in the map? And I should be able to do that at any time I want?
Who Posted
|
|